Jira
SUMMARY
- Workato's Jira connector synchronizes projects and issues between Jira and other systems such as Zendesk, ServiceNow, and Salesforce's Desk.com.
- This connector supports Jira Cloud, Jira Data Center, and on-premise instances version 7.x and later.
- We recommend using API tokens, OAuth 2.0, or personal access tokens for authentication.
- API token authentication doesn't support on-prem Jira connections.
- Jira users with login access can connect using their credentials, but we recommend creating a separate user with Jira Administrator global permissions.
Jira provides a simple way to organize and plan the release of any software. This allows development teams to lay out key steps to follow when releasing the software including:
- Plan
- Track
- Release
- Report
You can use Workato to sync projects and issues between Jira and other issue tracking systems, such as Zendesk, ServiceNow, and Salesforce's Desk.com.
Use cases
Explore Jira connector capabilities with our use cases documentation. Discover how you can use the Jira connector to create powerful multi-app workflows and automations:
- Provision Jira and Okta users for new employees in Workday.
- Create or update Jira issues from new PagerDuty incidents.
- Create Jira issues for new ServiceNow incidents.
API version
The Jira connector uses the Jira Cloud REST API v2.
Supported editions and versions
The Jira connector works with:
- Jira Cloud instances
- Jira on-premise instances version 7.x and later
- Jira Data Center, which replaced Jira Server
Connection setup
There are four ways to connect to Jira:
We strongly recommend using API tokens, OAuth 2.0, or personal access tokens to connect to Jira instead of basic authentication with password.
LIMITATIONS
Authentication methods for the Jira connector have the following limitations:
- Real-time triggers aren't supported with OAuth 2.0.
- On-prem Jira connections aren't supported with API token authentication.
- Atlassian deprecated basic authentication for cloud connections in December 2018. On-premise Jira is not affected.
API token
View API token steps
API tokens authenticate your Atlassian account without using a username and password. API token authentication doesn't support connections to on-premise Jira.
Prerequisites
You must generate an Atlassian API token for this authentication method. Refer to the Atlassian Manage API tokens guide for more information.
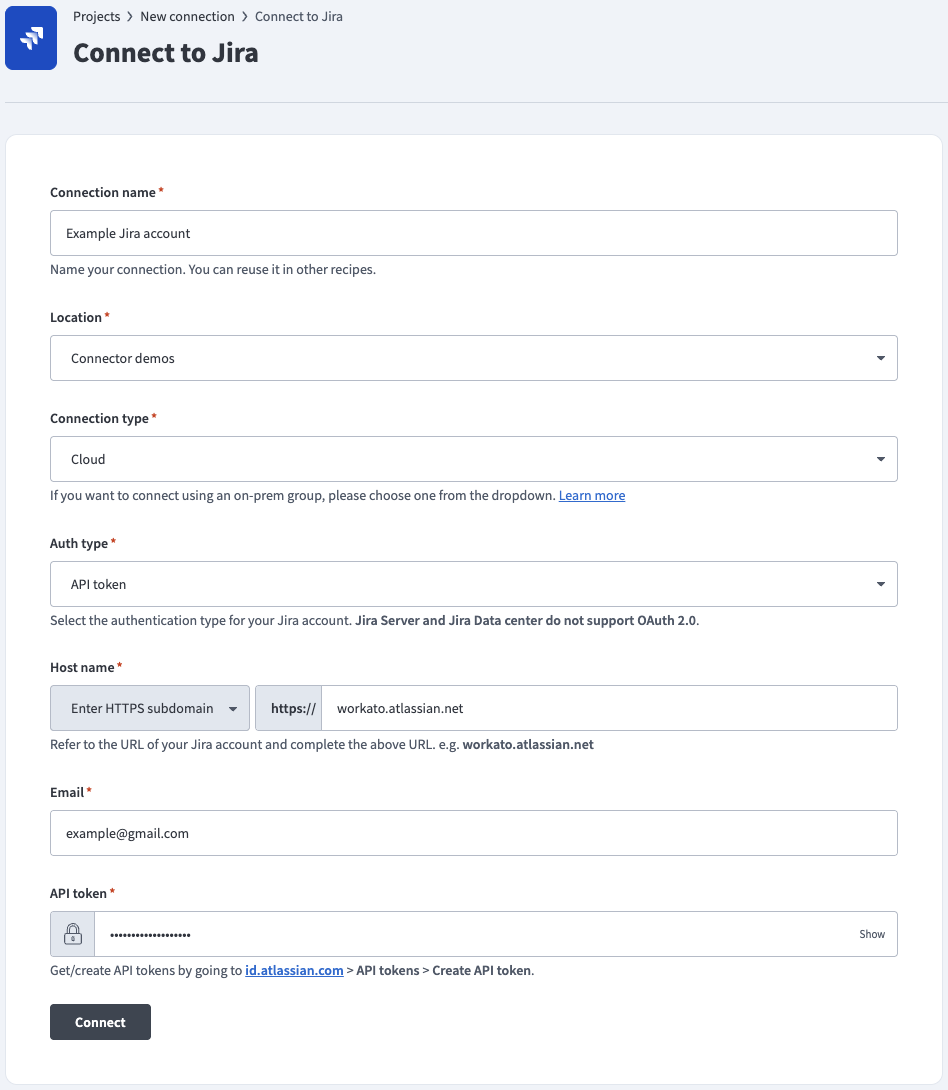
Connect to Jira using an API token
Complete the following steps to connect to Jira in Workato using an API token:
Click Create > Connection or press C twice.
Search for and select Jira as your connection on the New connection page.
Provide a name for your connection in the Connection name field.
 API token auth
Use the Location drop-down menu to select the project where you plan to store the connection.
Use the Connection type drop-down menu to select your connection type.
Use the Auth type drop-down menu to select API token or Service account (API token), depending on your account type.
Enter the URL subdomain for your Jira instance in the Host name field. For example: workato.atlassian.net
Enter the Email of the Jira account to link to Workato.
Enter the API token for your Atlassian account. Refer to the Atlassian Manage API tokens guide to generate this value.
Optional. Use the Custom OAuth profile drop-down menu to select a custom OAuth profile for your connection.
Click Connect.
OAuth 2.0
View OAuth 2.0 steps
OAuth 2.0 enables you to share specific data with an application while keeping your username, password, and other information private. OAuth 2.0 supports on-premise Jira connections.
REAL-TIME TRIGGERS NOT SUPPORTED
OAuth 2.0 doesn't support real-time triggers because it is incompatible with webhooks. As an alternative, you can register the Webhooks connector in Jira to use Jira's static webhook functionality. Refer to the Cloud Jira or Jira Datacenter webhook documentation for registration steps.
Prerequisites
You must generate an Atlassian client ID and client secret if you plan to connect to Jira Data Center using OAuth 2.0. Refer to the Atlassian Configure an incoming link guide to generate these values using https://www.workato.com/oauth/callback as the redirect URI.
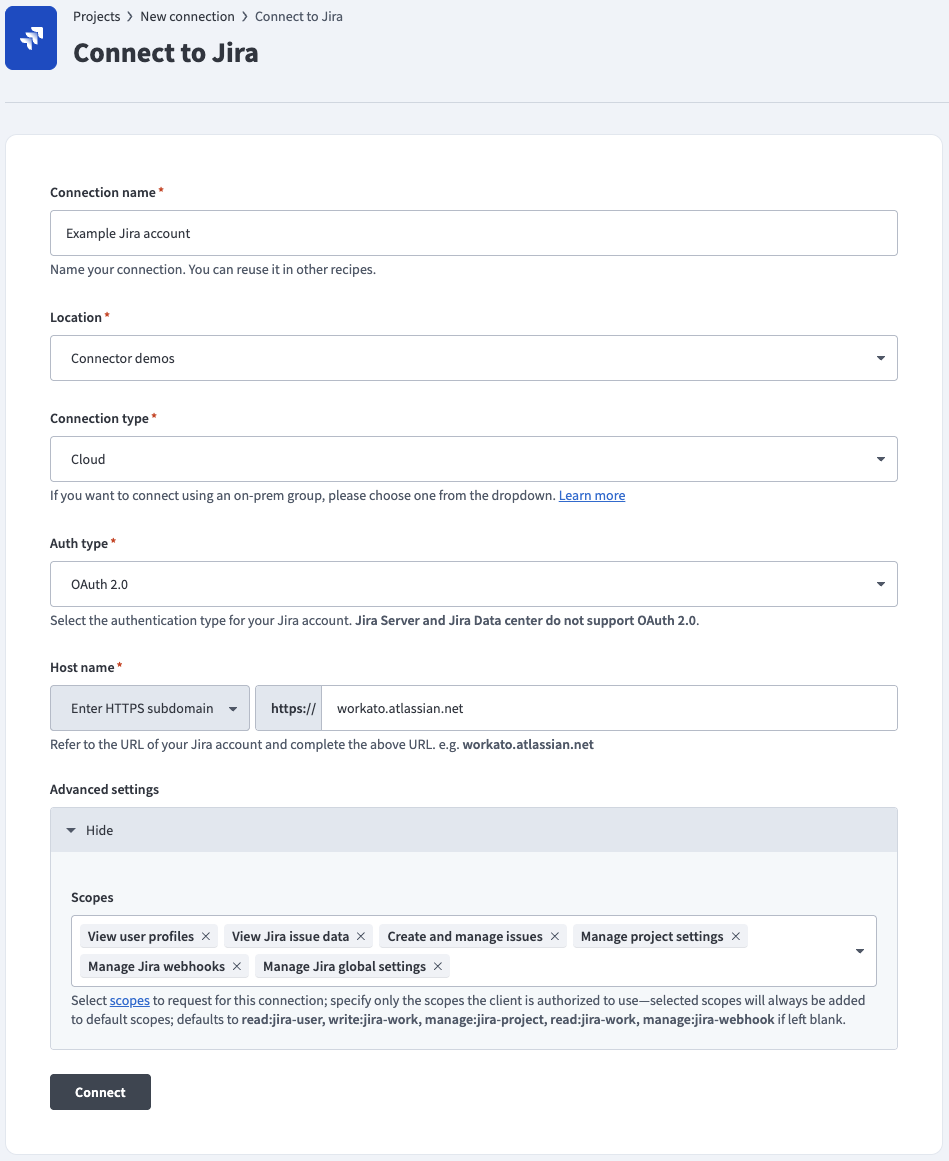
Connect to Jira using OAuth 2.0
Complete the following steps to connect to Jira in Workato using OAuth 2.0:
Click Create > Connection or press C twice.
Search for and select Jira as your connection on the New connection page.
Provide a name for your connection in the Connection name field.
 OAuth 2.0 auth
Use the Location drop-down menu to select the project where you plan to store the connection.
Use the Connection type drop-down menu to select your connection type.
Use the Auth type drop-down menu to select OAuth 2.0 (Cloud - Atlassian-hosted Jira), or select OAuth 2.0 (Data Center) to connect to an on-prem Jira instance.
Enter the URL subdomain for your Jira instance in the Host name field. For example: workato.atlassian.net
Go to the Advanced settings section and enter your Atlassian Client ID and Client secret if you're connecting to an on-prem Jira instance. Refer to the Prerequisites section to generate these values.
Optional. Use the Scopes drop-down menu to select the authorization scopes to request. Workato requests the following scopes by default:
Cloud-hosted Jira defaults:
read:jira-userwrite:jira-workmanage:jira-projectread:jira-workmanage:jira-webhook
Jira Data Center defaults:
READWRITE
Optional. Use the Custom OAuth profile drop-down menu to select a custom OAuth profile for your connection.
Click Connect and sign in to your Jira instance.
Authorize Workato's request to access your Jira instance.
Personal access tokens
View Personal access tokens steps
Personal access tokens (PATs) authenticate your Atlassian account without using a username and password. PAT authentication supports on-premise Jira connections.
Prerequisites
You must generate an Atlassian personal access token for this authentication method. Refer to the Atlassian Using Personal Access Tokens guide for more information.
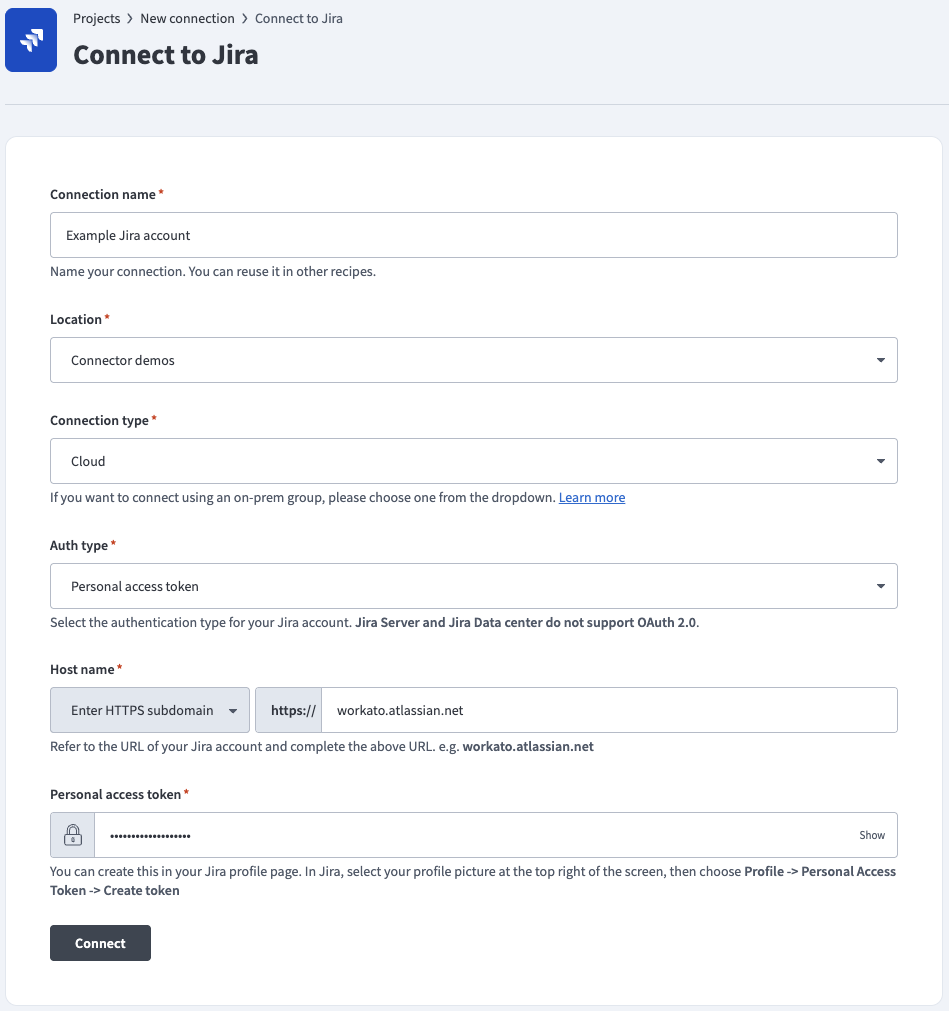
Connect to Jira using a personal access token
Complete the following steps to connect to Jira in Workato using a personal access token:
Click Create > Connection or press C twice.
Search for and select Jira as your connection on the New connection page.
Provide a name for your connection in the Connection name field.
 Personal access token auth
Use the Location drop-down menu to select the project where you plan to store the connection.
Use the Connection type drop-down menu to select your connection type.
Use the Auth type drop-down menu to select Personal access token.
Enter the URL subdomain for your Jira instance in the Host name field. For example: workato.atlassian.net
Enter the Personal access token of the Jira account to link to Workato. Refer to the Atlassian Using Personal Access Tokens guide to generate this value.
Optional. Use the Custom OAuth profile drop-down menu to select a custom OAuth profile for your connection.
Click Connect.
Basic authentication with password
View Basic authentication with password steps
Basic authentication connects to your Atlassian account using a username and password. Basic authentication supports on-premise Jira connections.
DEPRECATED PASSWORD AUTHENTICATION
Atlassian deprecated basic authentication for cloud connections in December 2018. On-premise Jira is not affected.
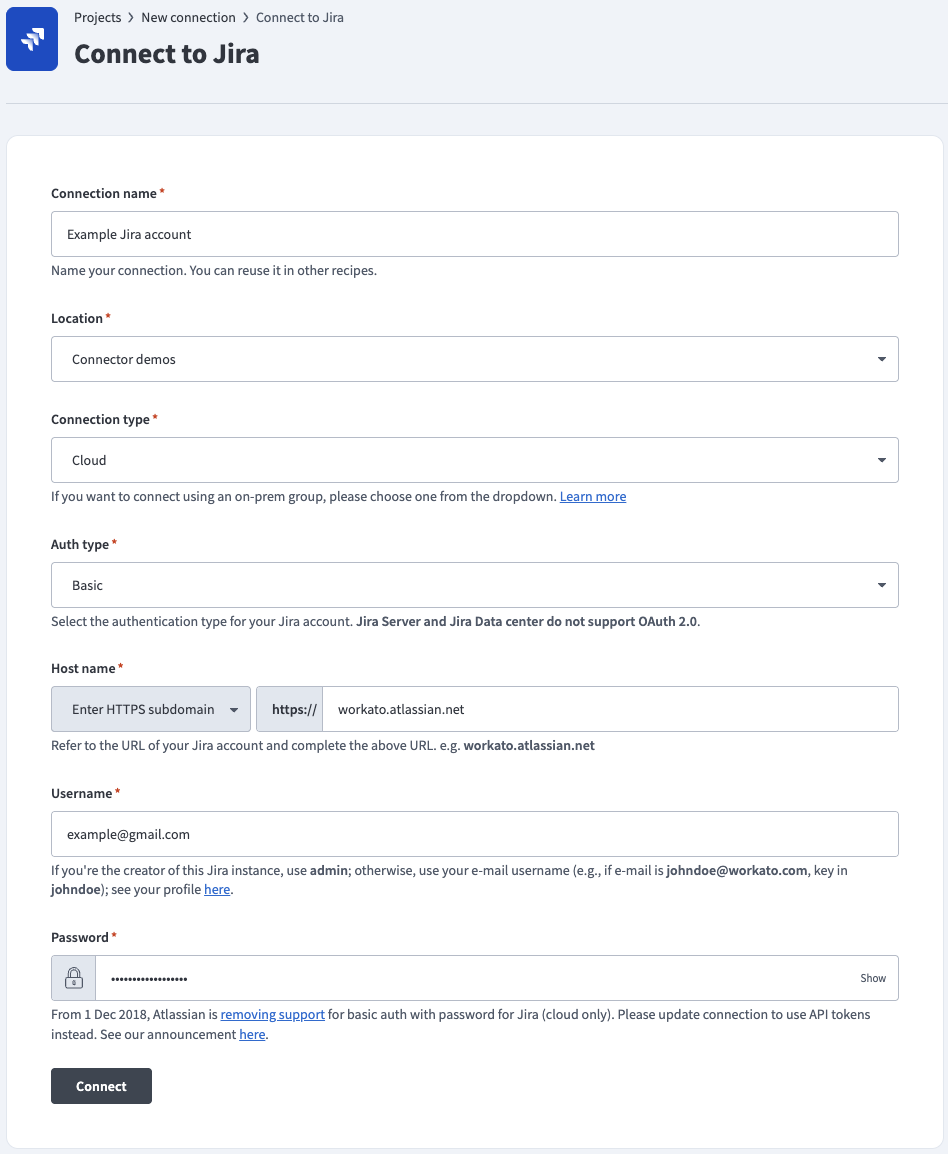
Connect to Jira using basic authentication
Complete the following steps to connect to Jira in Workato using basic authentication:
Click Create > Connection or press C twice.
Search for and select Jira as your connection on the New connection page.
Provide a name for your connection in the Connection name field.
 Basic password auth
Use the Location drop-down menu to select the project where you plan to store the connection.
Use the Connection type drop-down menu to select your connection type.
Use the Auth type drop-down menu to select Basic.
Enter the URL subdomain for your Jira instance in the Host name field. For example: workato.atlassian.net
Enter your Jira Username and Password.
Optional. Use the Custom OAuth profile drop-down menu to select a custom OAuth profile for your connection.
Click Connect.
Roles and permissions required to connect
Jira, Jira Cloud, and Jira Data Center users who have login access to their Jira instance can connect to Workato using their credentials. However, we recommend that you create a separate user (with Jira Administrator global permissions) for integration purposes.
Jira connection respects the project permissions schemes in your Jira project. You must ensure that your Jira account has sufficient permissions to perform the desired actions on the relevant Jira objects.
Jira project permissions
There are three main ways a user can have access to objects within a project:
- People
- Issue security schemes
- Permission schemes
People
Users can be added to a project (through Project Settings > People) using two methods:
Searching for and selecting a specific user, and then specifying the user's project role.
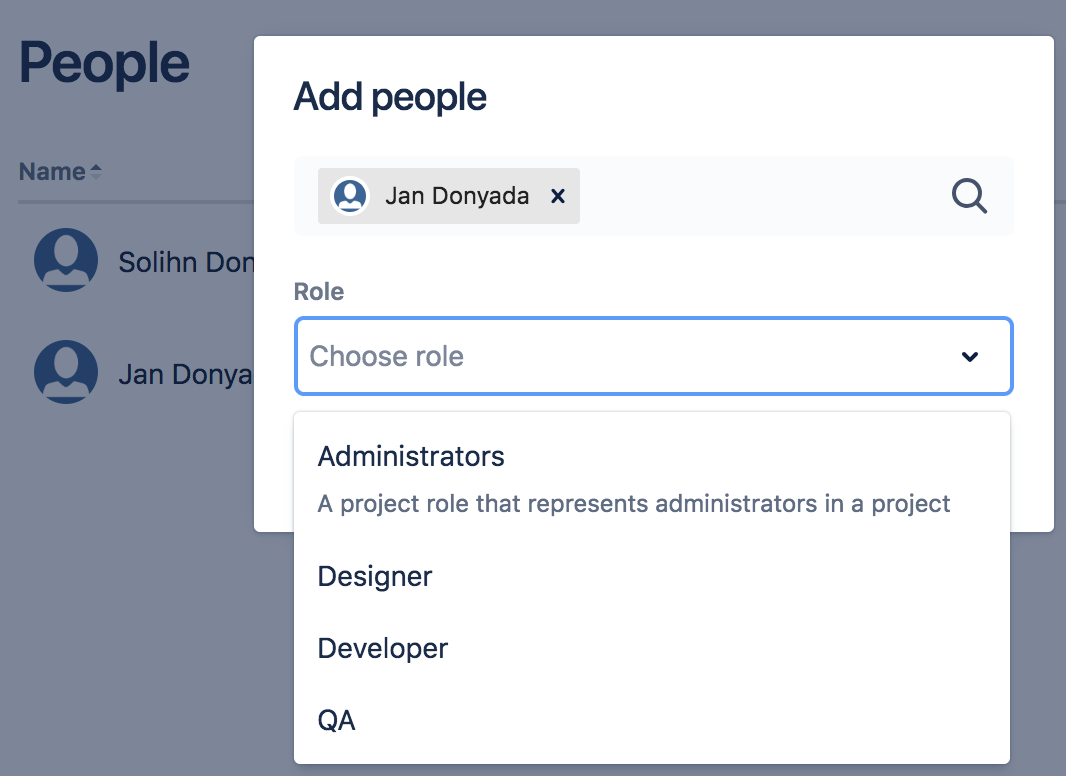 Choosing a project role for a user Jan Donyada
Project roles allow users to be associated with functional roles. For example, if your organization requires all software development issues to be tested by a QA person before being closed, you could:
- Create a project role called QA.
- Create a permission scheme called Software Development, in which you assign the Close issue permission to the QA role.
- Associate the Software Development permission scheme with all software development projects.
- For each software development project, add your QA engineers, assigning them the QA project role.
Searching for a Group and then specifying the group's project role.
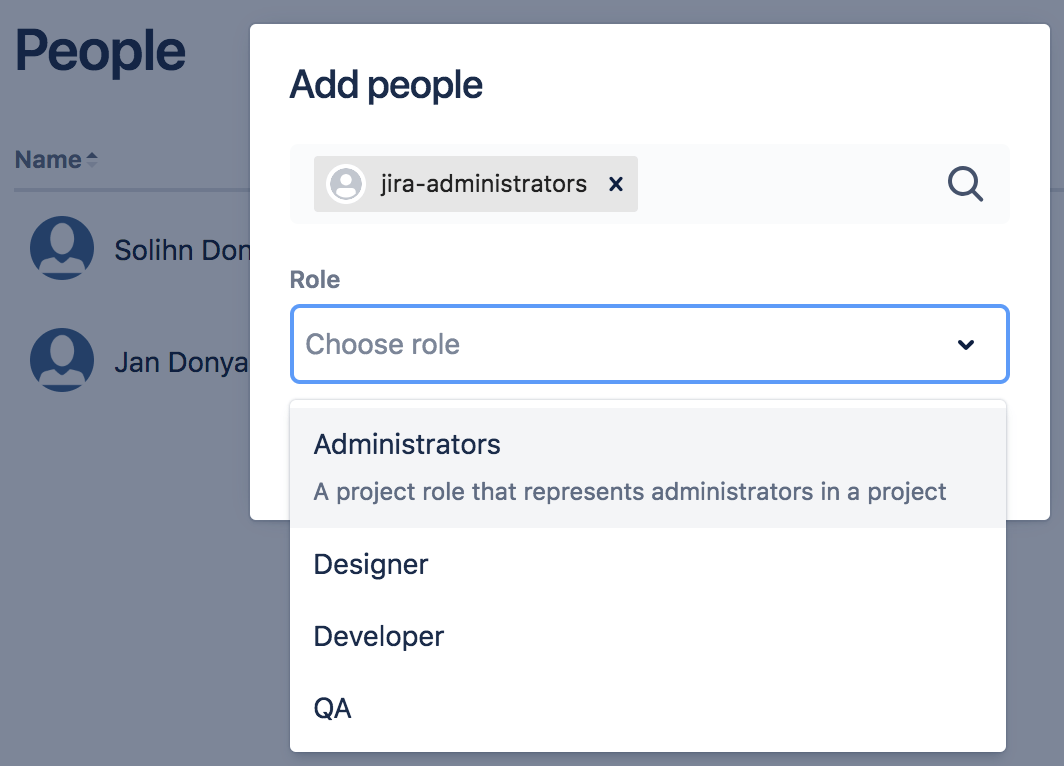 Choosing a project role for the Jira Administrators group
A group contains multiple members. Groups are similar to project roles, but with one key difference: group membership is global, whereas project role membership is project-specific. Also, group membership can be changed only by Jira administrators, whereas project role membership can be changed only by project administrators.
Issue security schemes
Issue security schemes can be created and added to each project, allowing control over who can view and edit the issues of the project.
A scheme can have several security levels, and users or groups of users can be assigned to each security level. This ensures that only users who are assigned the appropriate security level can view the issue.
If your project has a defined issue security scheme, your linked Jira account must be a member of the appropriate security level in the security scheme. Typically, a security level's members include:
- Individual members
- Groups
- Project Roles
- Issue roles such as:
- Reporter
- Project Lead
- Current Assignee
- Anyone (for example, to allow anonymous access)
In the following example, the issue security scheme has a defined security level which allows access to only certain users, groups, and project roles.
 Only user 'Jan Donyada', users in the 'Jira Administrators' group, and users with the 'QA' project role have access to the issues, as defined by the 'Top-secret' security level
Permission schemes
Project permissions are created within Permissions schemes, which are then assigned to specific projects by your Jira Administrators.
Permissions control access to specific actions such as issue creation, issue editing, and issue assignment. Go to Project Settings > Permissions in Jira to view permissions.
Each permission can be granted across:
- Project roles
- Applications (Jira, Jira Service Desk, Jira Data Center, and more.)
- Groups
Project roles
If a permission scheme associated with a project has defined role-specific permissions for specific actions, your linked Jira account must be assigned the same role to be authorized to use those actions in your Workato recipes.
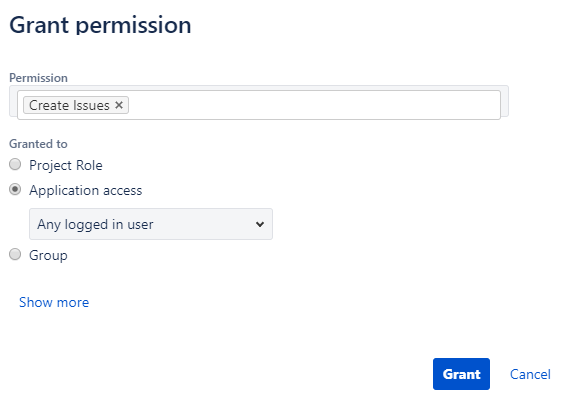
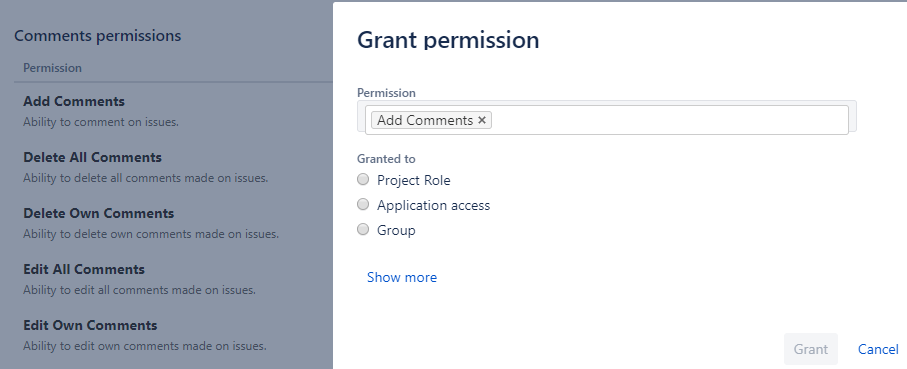
For example, in the project permission scheme below, only the QA role has been permitted to perform the Close Issues action. 
If the Workato recipe wants to perform any Close issue actions, the linked Jira account must also be assigned the role QA for the action to be authorized.
Application access
Application access settings let you control which person has access to which products. If your site only has one product (for example, if you have a Confluence-only or Jira-only instance), users are automatically granted access to that product when they sign up.
If your Workato recipes only need to perform specific actions on your Jira Software instance, then Jira Software must be selected for those actions.
 Only users of Jira Software are permitted to assign issues
Likewise, if your Workato recipes only need to perform specific actions on your Confluence instance, then Confluence must be selected for those actions.
If your Workato recipes perform specific actions on both Jira Software & Confluence, then Any logged in user must be selected for those actions.
 Any logged in user of either Jira Software or Confluence is permitted to assign issues
Groups
If a permission scheme associated with a project has defined group-specific permissions for specific actions, your linked Jira account must be a member of that group to be authorized to use those actions in your Workato recipes.  The Jira Administrators group is permitted to manage sprints
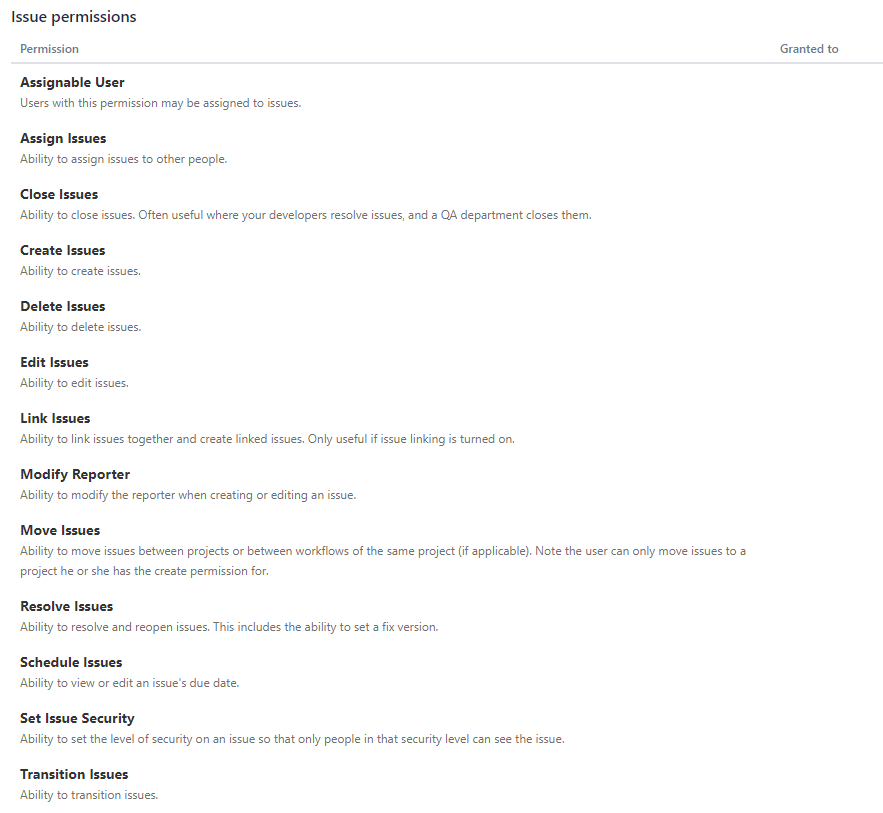
Supported Jira actions and their required permissions
Upload/download actions
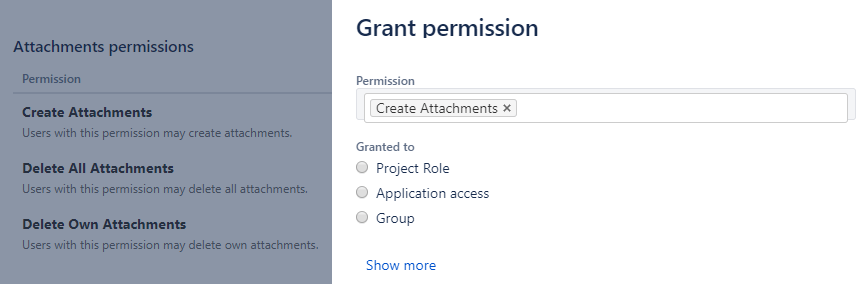
To use the upload and download attachment actions, your linked Jira account must be added to the permissions under the Attachment Permissions tab of the permissions page.
Comments triggers and actions
To use triggers and actions relating to Comments, your linked Jira account must be added to the permissions under the Comments Permissions tab of the permissions page.
Issues triggers and actions
To use triggers and actions relating to Issues, your linked Jira account must be added to the permissions under the Issues Permissions tab of the permissions page.
A 403 - Forbidden error displays if the connected Jira user doesn't have the required permissions to access an object or action.
Refer to Jira's permissions guide for information about how to manage project permissions.
To troubleshoot why a user is unable to access or perform actions on certain projects, issue types, or fields, you can use the Jira permission helper.
Jira permissions helper
You can use the Jira permissions helper to find out why a user is unable to view/edit certain projects or fields.
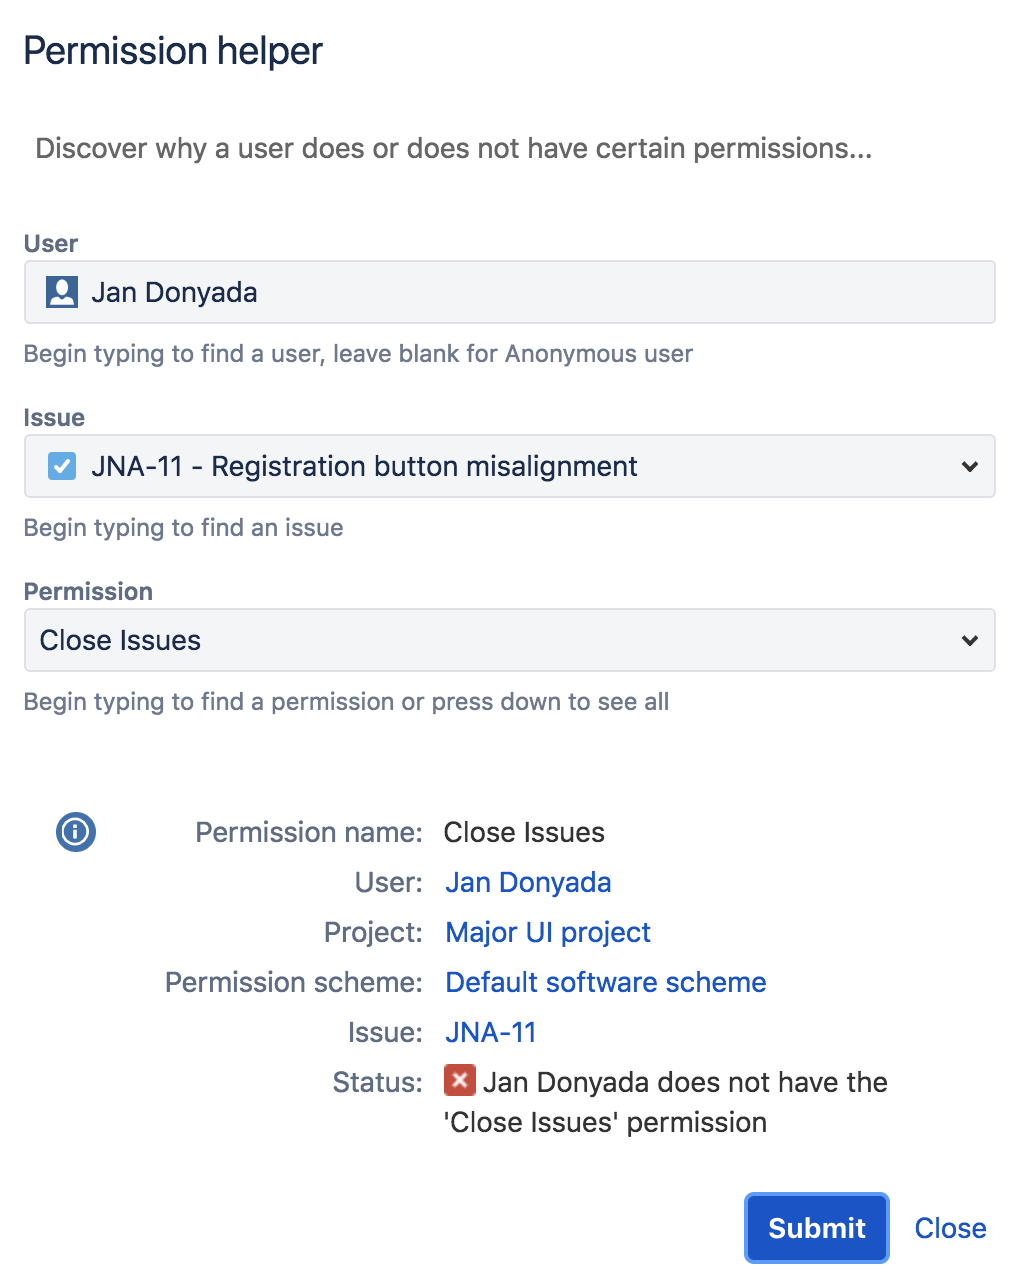
To use this, you must have Jira Administrator access to your Jira instance. Refer to the Jira Permissions helper guide for more information.
Using Jira real-time triggers
To use Jira real-time triggers, a webhook must first be registered in your connecting Jira instance. Registering webhooks to Jira instances requires Jira Administrator global permissions.
If your linked Jira account has Jira Administrators global permissions, then Workato automatically registers a webhook in your Jira instance when your Workato recipe (containing a Jira real-time trigger) is started for the first time.
For more information on Jira administrators & global permissions, check out Jira's global permissions guide.
Your linked Jira account must have Jira Administrators global permissions to register webhooks. You can complete the following if you don't have the required permissions:
- Work with a user that has the correct permissions to register webhooks.
- Request access to Jira Administrators global permissions.
- Use a webhook trigger with the Webhooks connector and Jira's static webhook functionality as an alternative for real-time triggers in the Jira connector.
Registering a webhook trigger as a Jira Administrator
If you're a Jira Administrator with global permissions, you can register a webhook for your fellow Jira instance users who want to use it for their HTTP webhook trigger recipes.
This can be done from the Jira administration console. For more information on how to register a webhook through the Jira administration console, check out the Jira guide on registering a webhook.
How to register a webhook
Go to Jira administration console > System > Webhooks.
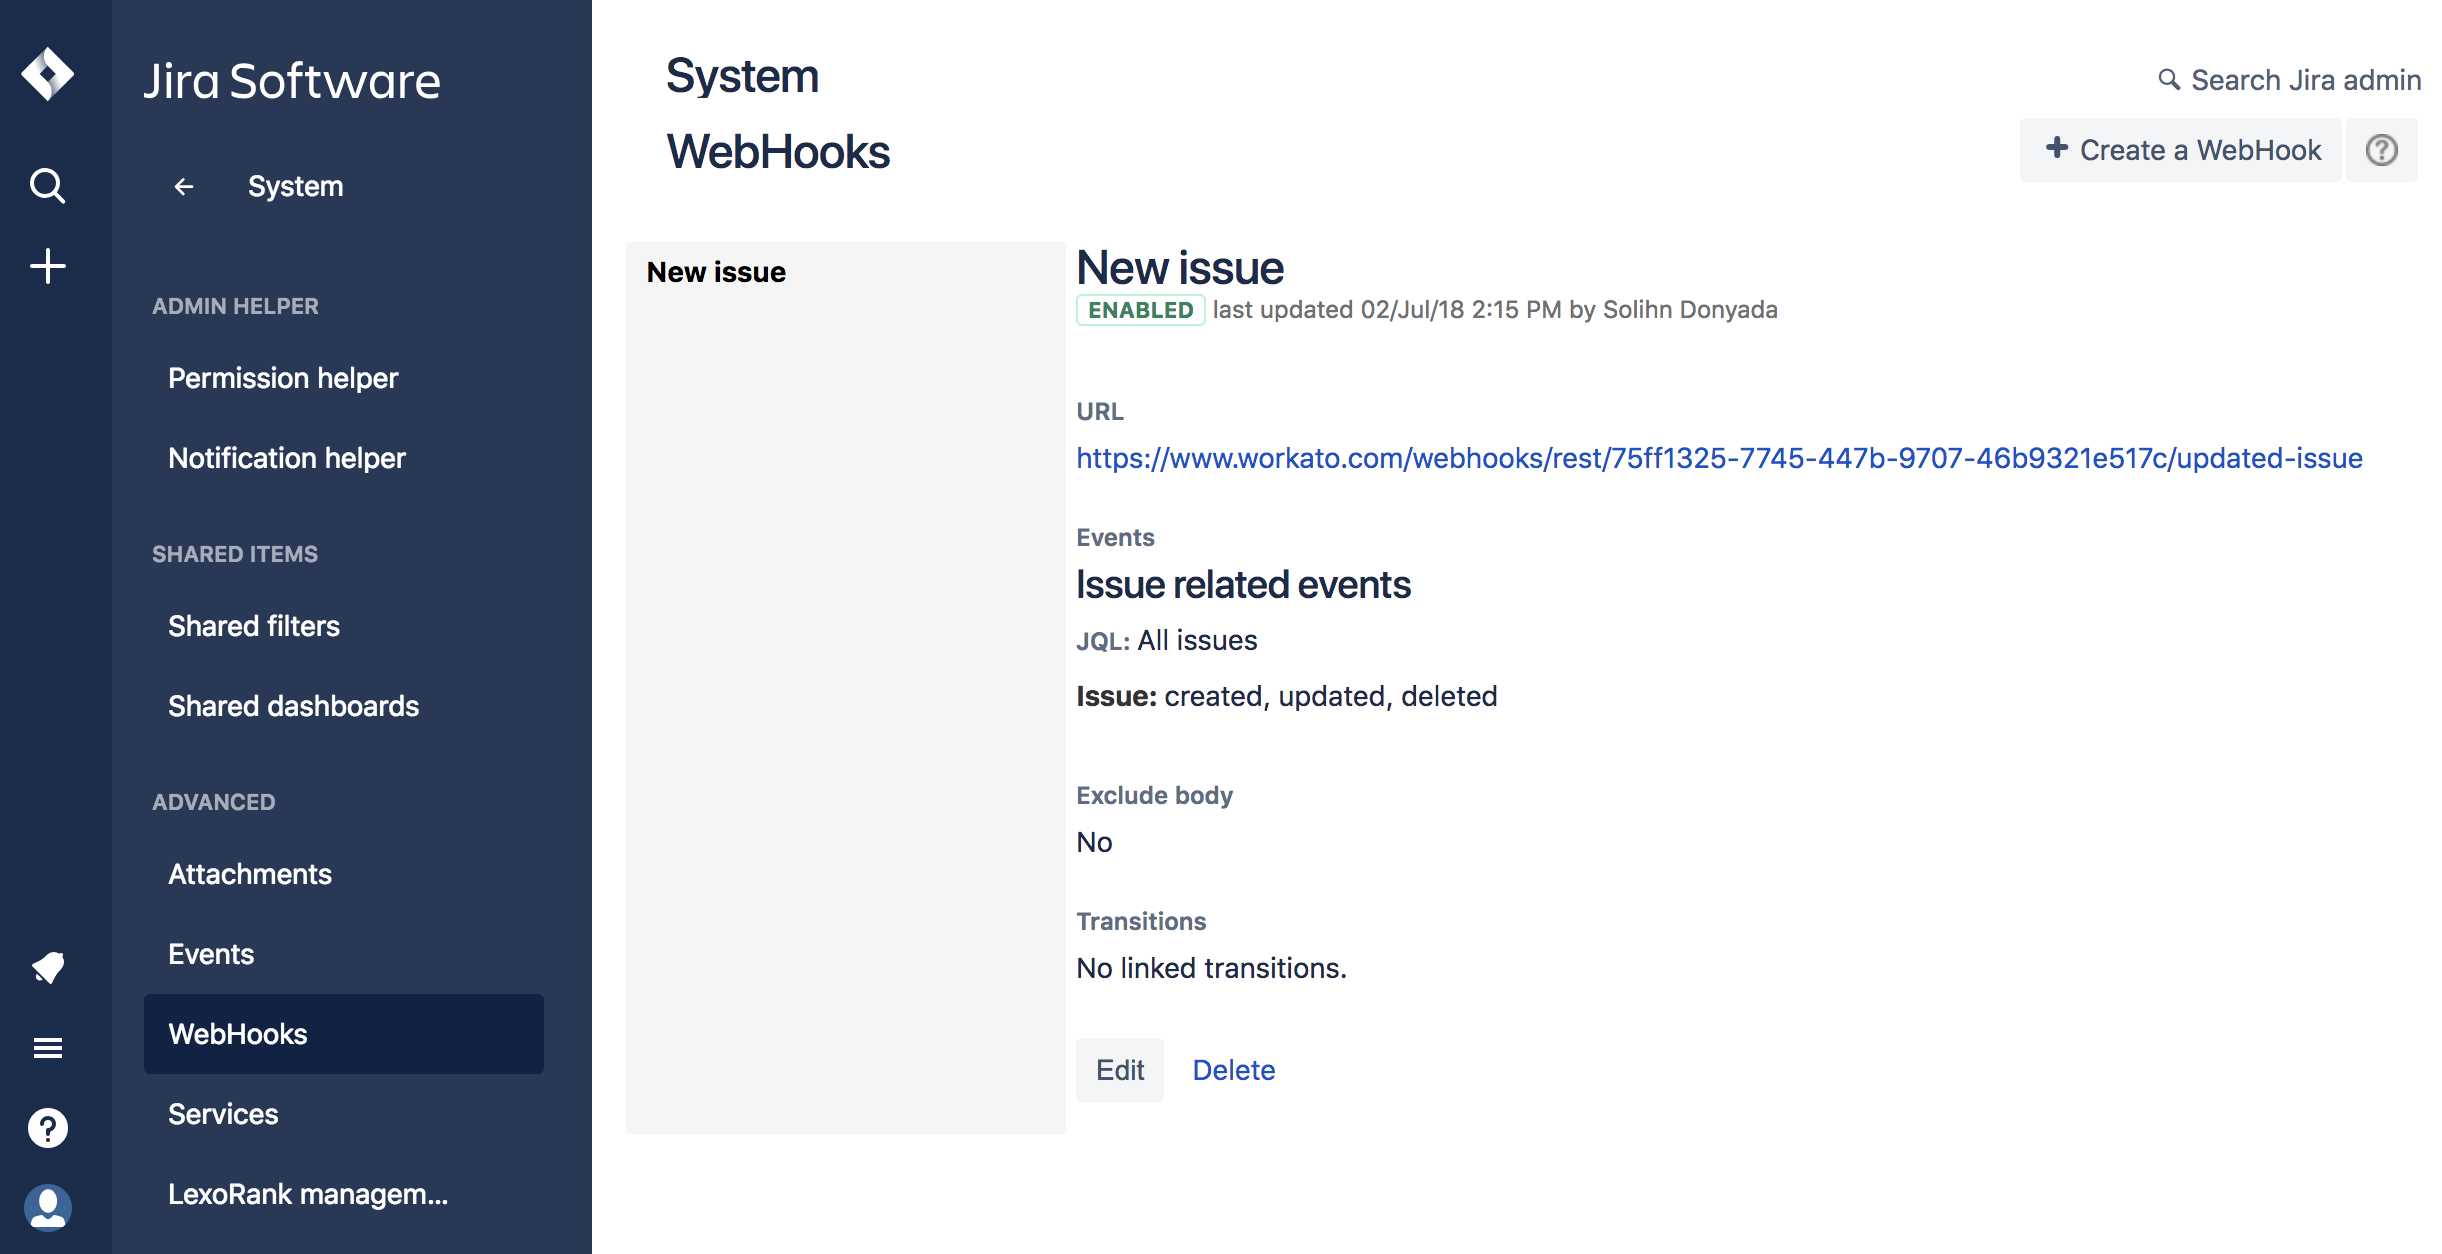 You should see a list of webhooks in the webhook summary page
Click Create a webhook in the top right-hand corner of the page. This should open the webhook form.
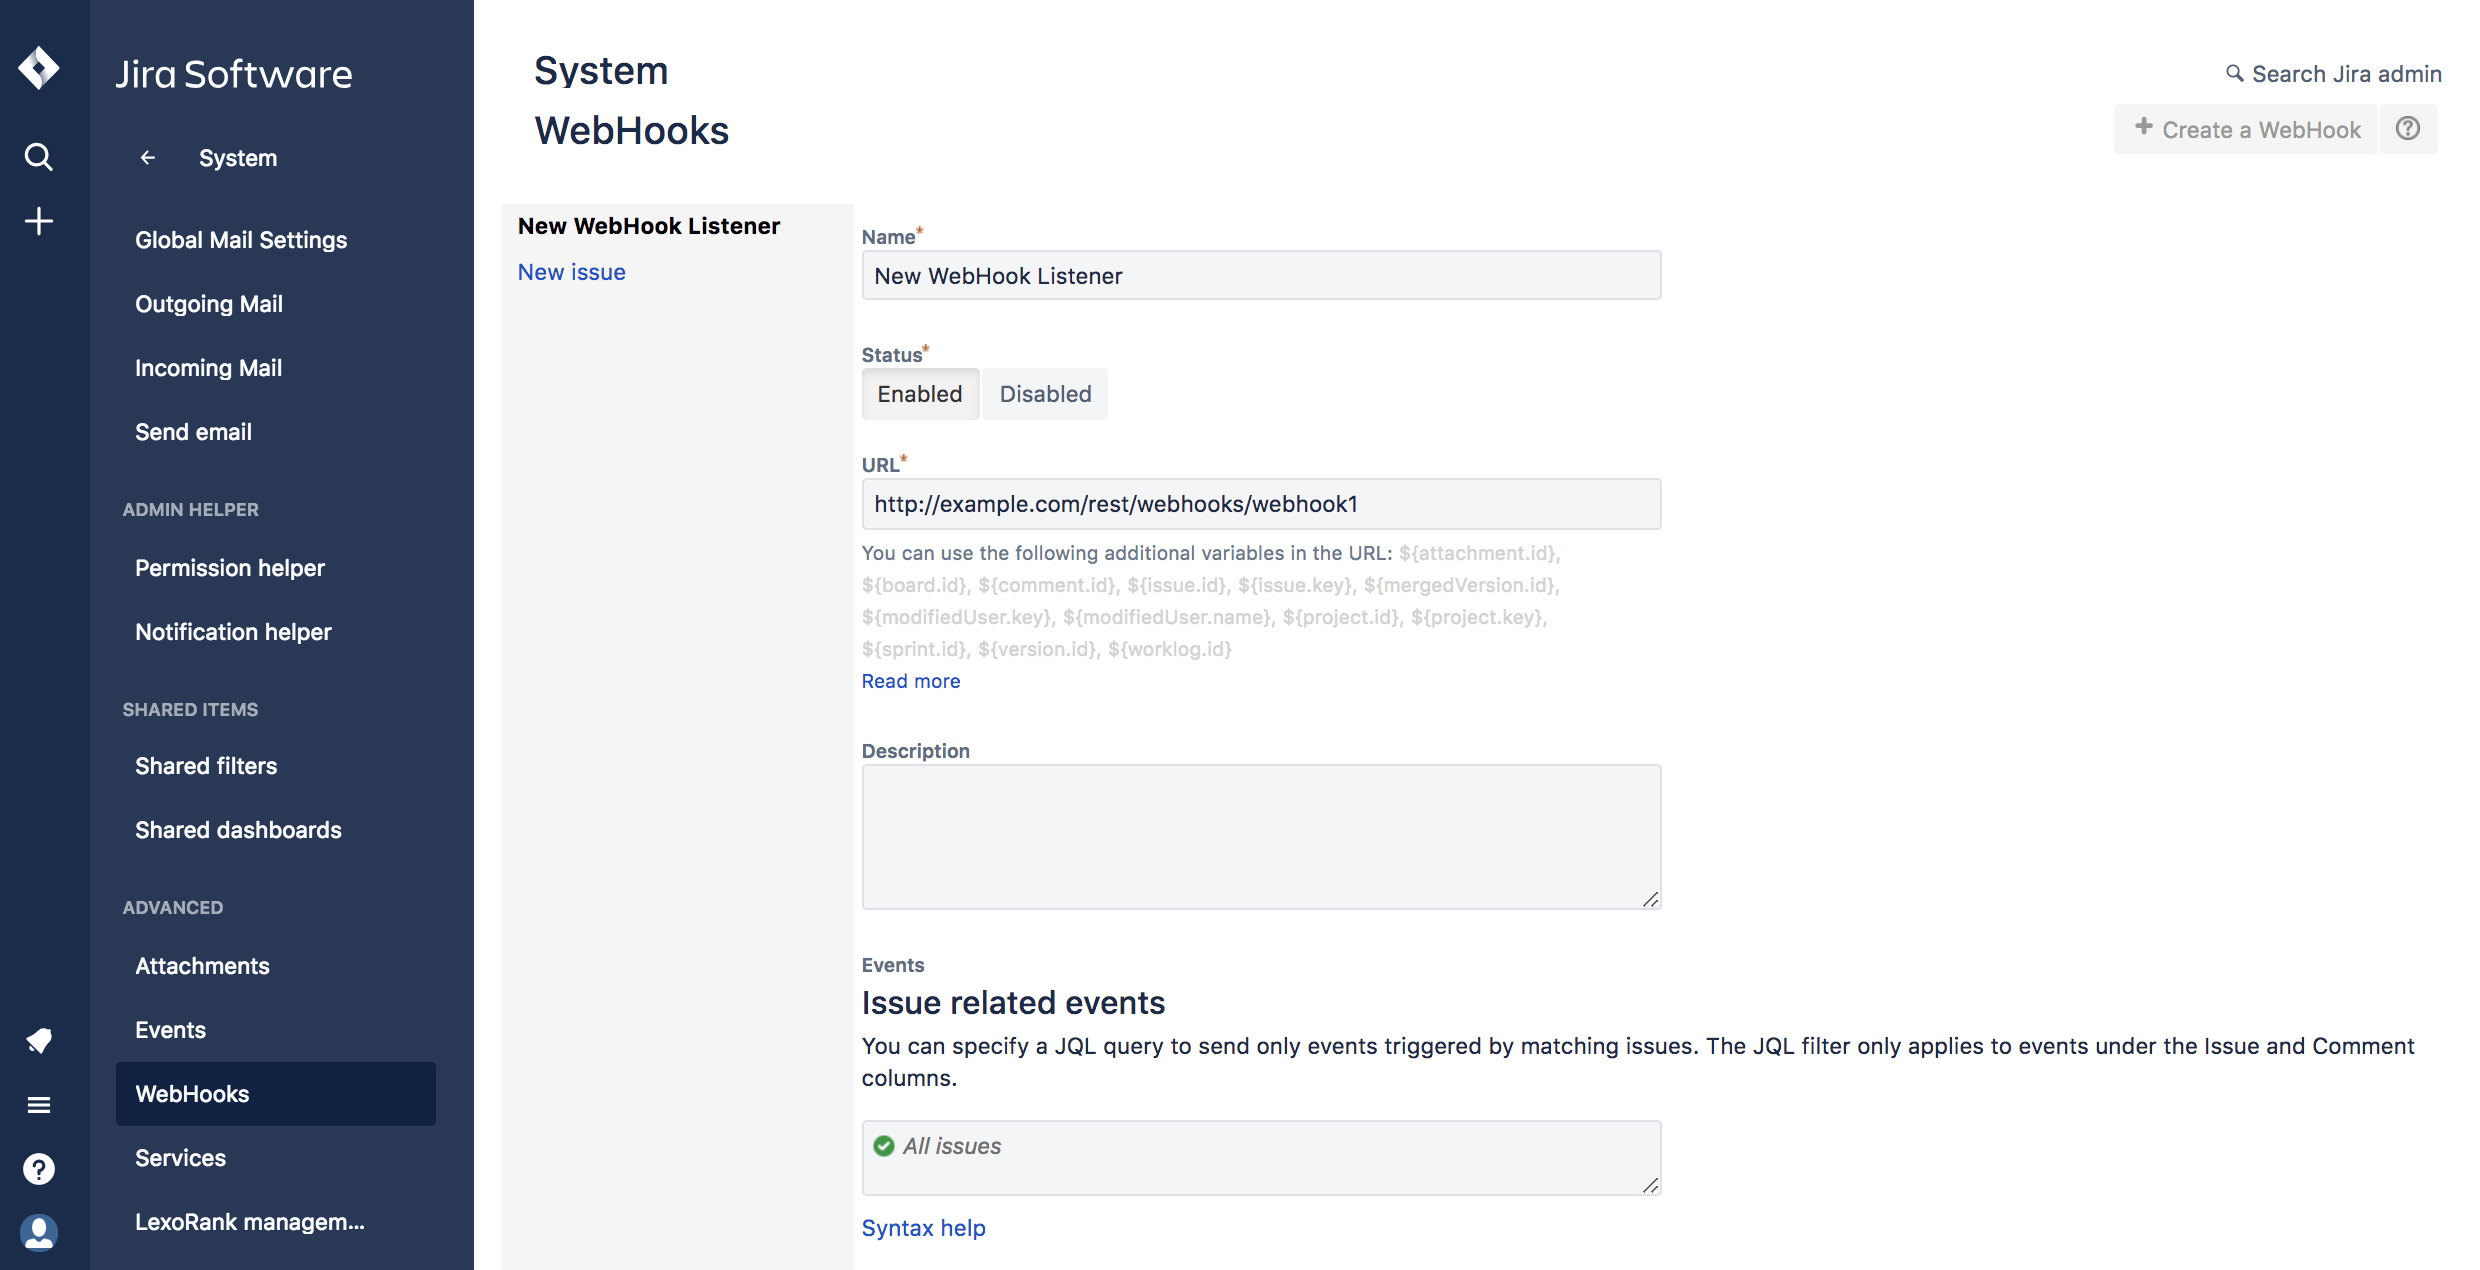 Form for registering a Jira webhook
Enter the details for your new webhook in the form:
- Enter a name for your webhook.
- Set the status to Enabled.
- Under URL, paste the target URL of the HTTP webhook trigger your Jira user is using for their recipe.
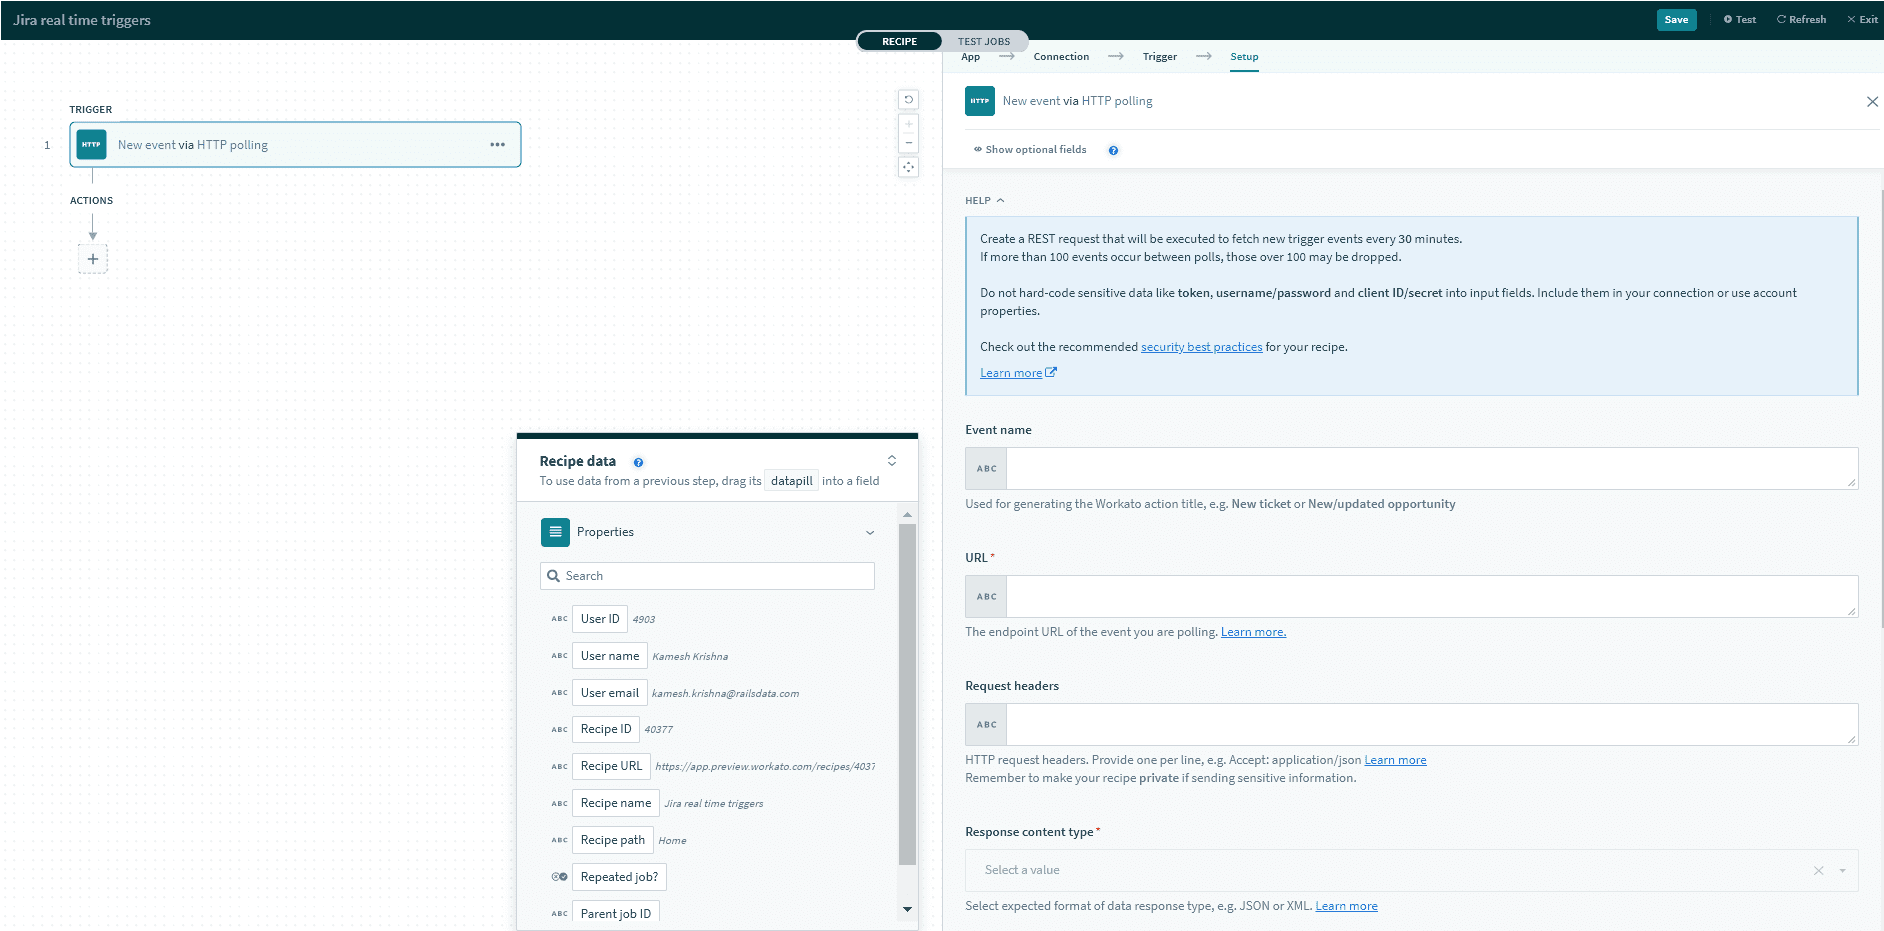 Obtain the URL from an HTTP 'New event through webhook' trigger in the Jira user's recipe
 - Check the boxes for the Jira events you plan to listen to, then click Create. For a full list of events and how to configure them, check out the Jira documentation for available Jira webhook events.
Last updated: