Jira Service Desk
Jira Service Desk empowers teams to deliver great service experiences and ensures your employees and customers can get help quickly. This provides both customers and employees an intuitive, self-service portal that provides them with one place to get help fast.
API version
The Jira Service Desk connector uses the Jira Service Desk Cloud REST API.
Supported editions and versions
The Jira Service Desk connector works with both cloud and on-prem instances 7.x and later.
Connection setup
The Jira Service Desk connector supports the following authentication types:
We strongly recommend using API tokens or OAuth 2.0 to connect to Workato.
API token
Use API token authentication to connect to Jira Service Desk with a token generated from your Atlassian account. Use basic authentication with password for on-prem instances.
Get an API token
Refer to Manage API tokens for your Atlassian account in the Atlassian documentation.
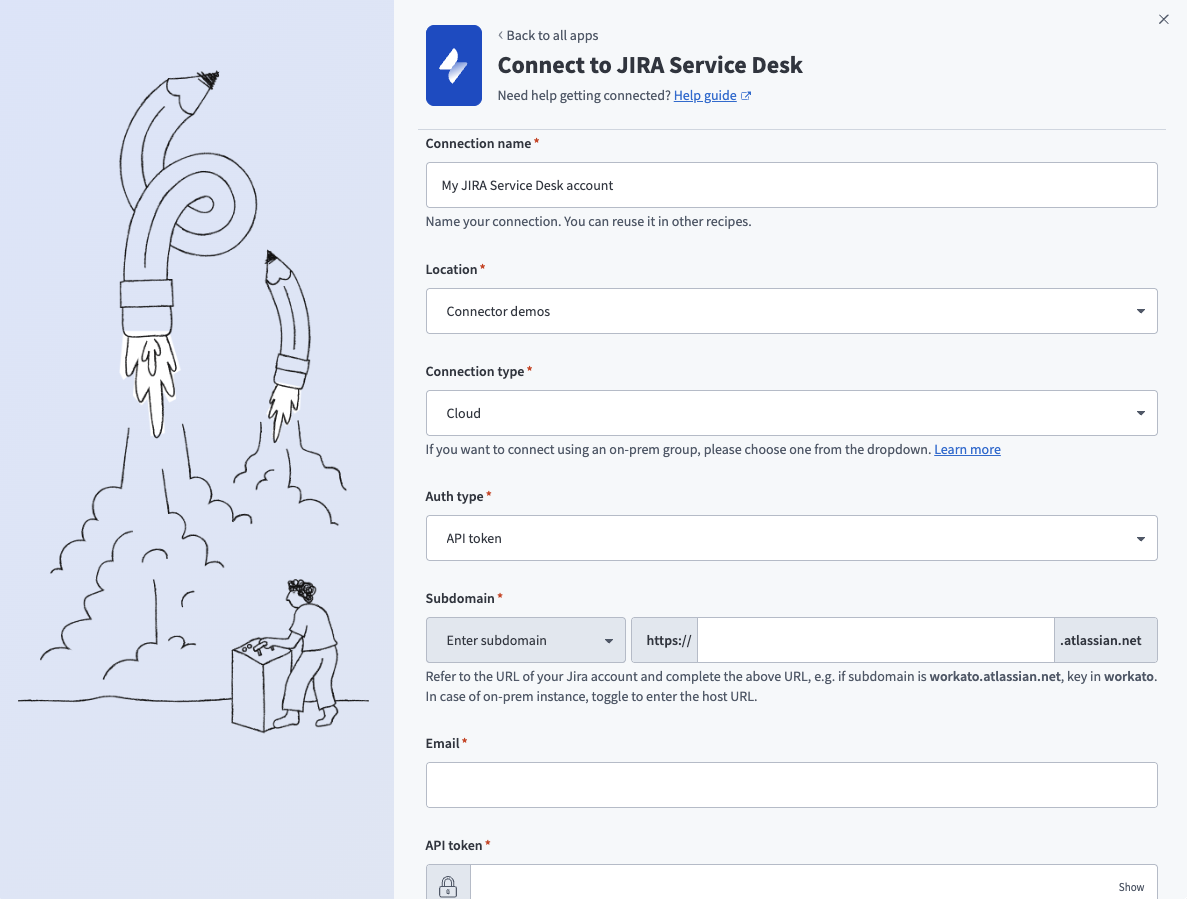
Connect to Jira Service Desk using an API token
Complete the following steps to set up an API token connection to Jira Service Desk in Workato:
Click Create > Connection or press C twice.
Search for and select Jira Service Desk on the New connection page.
Enter a name for your connection in the Connection name field.
 API token connection setup
Use the Location drop-down menu to select the project where you plan to store the connection.
Use the Connection type drop-down menu to select Cloud.
Use the Auth type drop-down menu to select API token.
Enter your Jira Service Desk subdomain in the Subdomain field.
Enter the email address for your Jira Service Desk account in the Email field.
Enter your API token in the API token field.
Optional. Use the Custom OAuth profile drop-down menu to select a custom OAuth profile for your connection.
Click Connect.
OAuth 2.0
Use OAuth 2.0 to connect to Jira Service Desk by signing in and granting access through Atlassian's authorization flow.
Default scopes
Workato requests the following scopes by default:
read:jira-userread:jira-workwrite:jira-workmanage:jira-projectmanage:jira-configurationmanage:jira-webhookread:servicedesk-requestwrite:servicedesk-requestmanage:servicedesk-customer
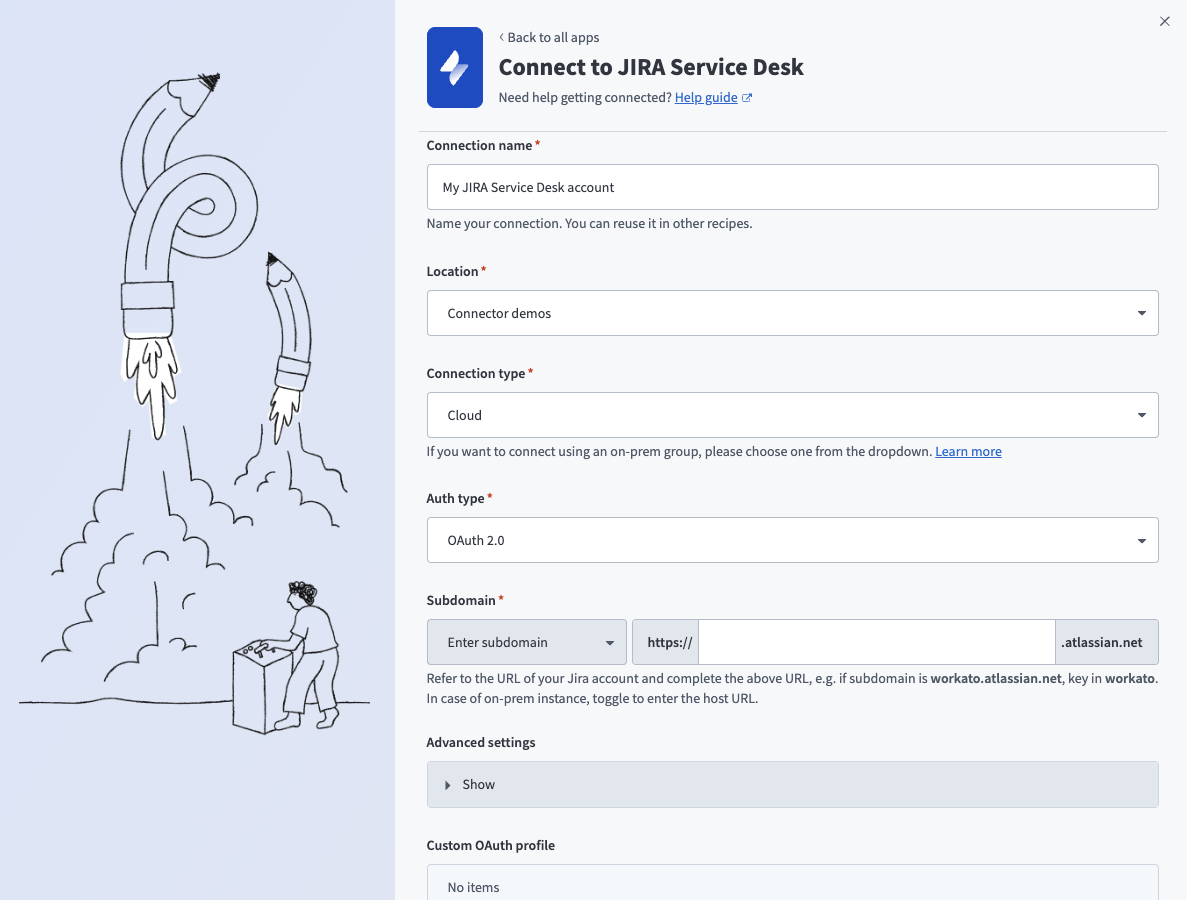
Connect to Jira Service Desk using OAuth 2.0
Complete the following steps to set up an OAuth 2.0 connection to Jira Service Desk in Workato:
Click Create > Connection or press C twice.
Search for and select Jira Service Desk on the New connection page.
Enter a name for your connection in the Connection name field.
 OAuth 2.0 connection setup
Use the Location drop-down menu to select the project where you plan to store the connection.
Use the Connection type drop-down menu to select Cloud.
Use the Auth type drop-down menu to select OAuth 2.0.
Enter your Jira Service Desk subdomain in the Subdomain field.
Optional. Expand Advanced settings and use the Scopes field to request additional scopes. Refer to Default scopes for the list of scopes Workato requests by default.
Optional. Use the Custom OAuth profile drop-down menu to select a custom OAuth profile for your connection.
Click Connect and sign in to your Jira Service Desk instance using your account username and password when prompted.
Authorize Workato's request to access your Jira Service Desk instance.
Basic authentication with password
Atlassian deprecated basic authentication with password for Jira Service Desk (cloud only) on December 1, 2018, in favor of API tokens. On-prem Jira Service Desk connections aren't affected by this change.
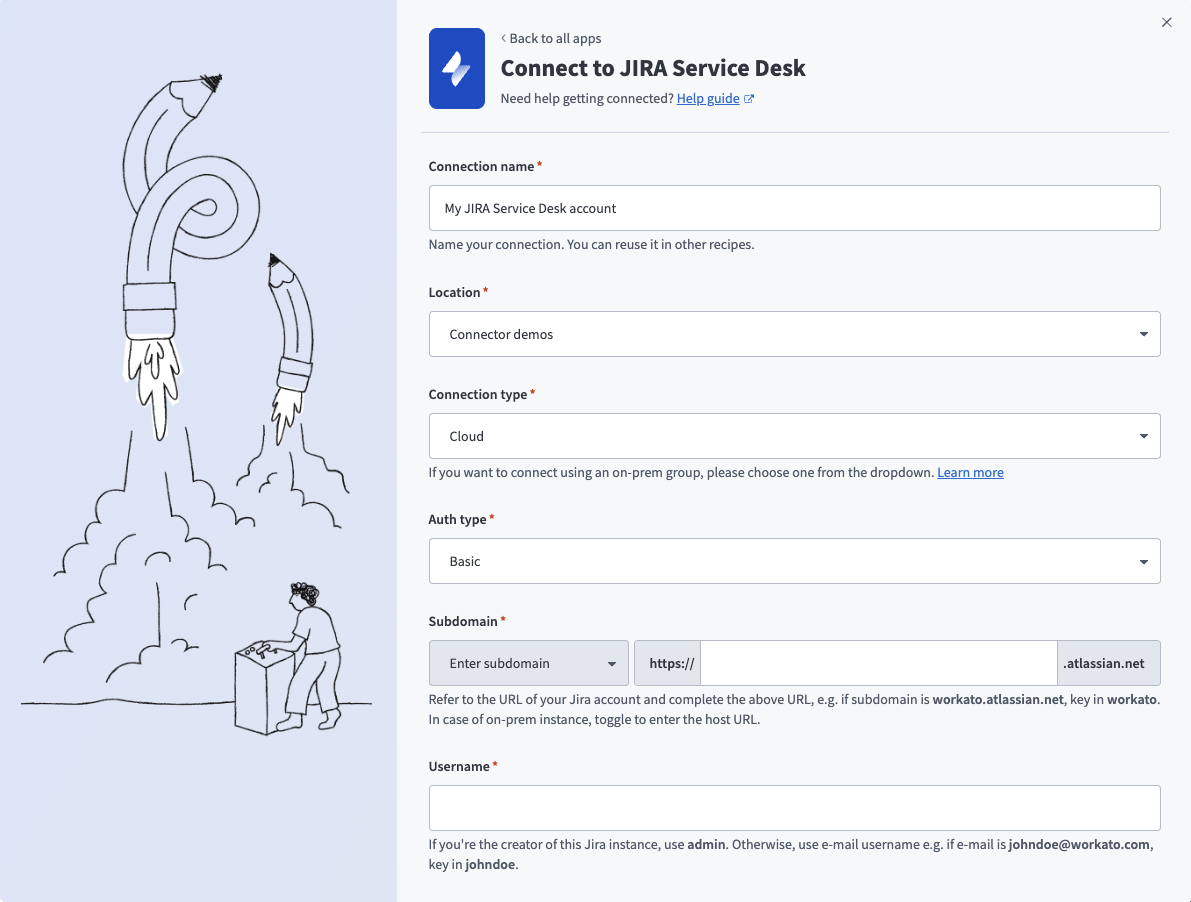
Connect to Jira Service Desk using basic authentication
Complete the following steps to set up a basic authentication connection to Jira Service Desk in Workato:
Click Create > Connection or press C twice.
Search for and select Jira Service Desk on the New connection page.
Enter a name for your connection in the Connection name field.
 Basic authentication connection setup
Use the Location drop-down menu to select the project where you plan to store the connection.
Use the Connection type drop-down menu to specify whether this is a cloud or on-prem connection.
Use the Auth type drop-down menu to select Basic.
Enter your Jira Service Desk subdomain in the Subdomain field.
Enter your Jira Service Desk username in the Username field.
Enter your Jira Service Desk password in the Password field.
Optional. Use the Custom OAuth profile drop-down menu to select a custom OAuth profile for your connection.
Click Connect.
Roles and permissions required to connect
Jira Service Desk users who have login access to their Jira Service Desk instance can connect to Workato using their credentials. However, we recommend that a separate user (with Jira Service Desk Administrator global permissions) be created for integration purposes.
Project permissions
As your Jira Service Desk connection respects the project permissions schemes in your Jira project, you must ensure that your Jira Service Desk account has sufficient permissions to perform the desired actions on the relevant Jira Service Desk objects.
There are 3 main ways a user can have access to objects within a project:
- People
- Issue security schemes
- Permission schemes
People
Users can be added to a project (via Project Settings → People) using 2 methods:
Searching & selecting a specific user, and then specifying the user's project role.
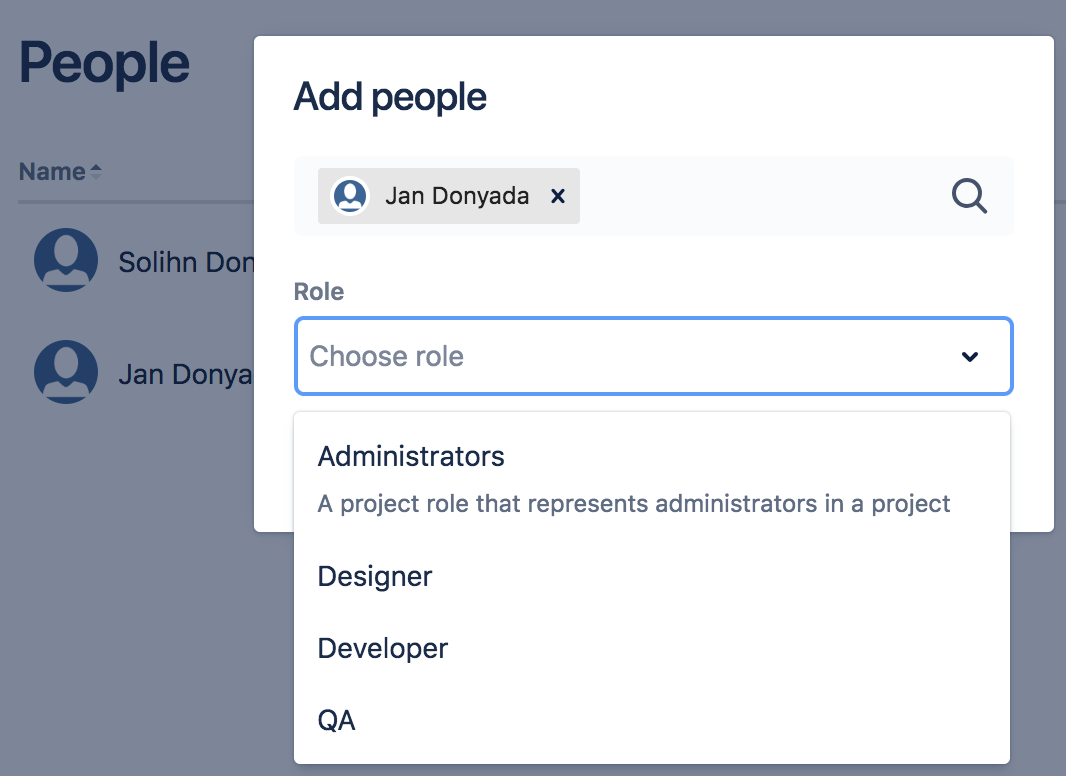 Choosing a project role for a user Jan Donyada
Project roles allow users to be associated with functional roles. For example, if your organization requires all software development issues to be tested by a 'QA' person before being closed, you could:
- Create a project role called 'QA'.
- Create a permission scheme called 'Software Development', in which you assign the 'Close issue' permission to the 'QA' role.
- Associate the 'Software Development' permission scheme with all software development projects.
- For each software development project, add your QA engineers, assigning them the 'QA' project role.
Searching for a Group and then specifying the group's project role.
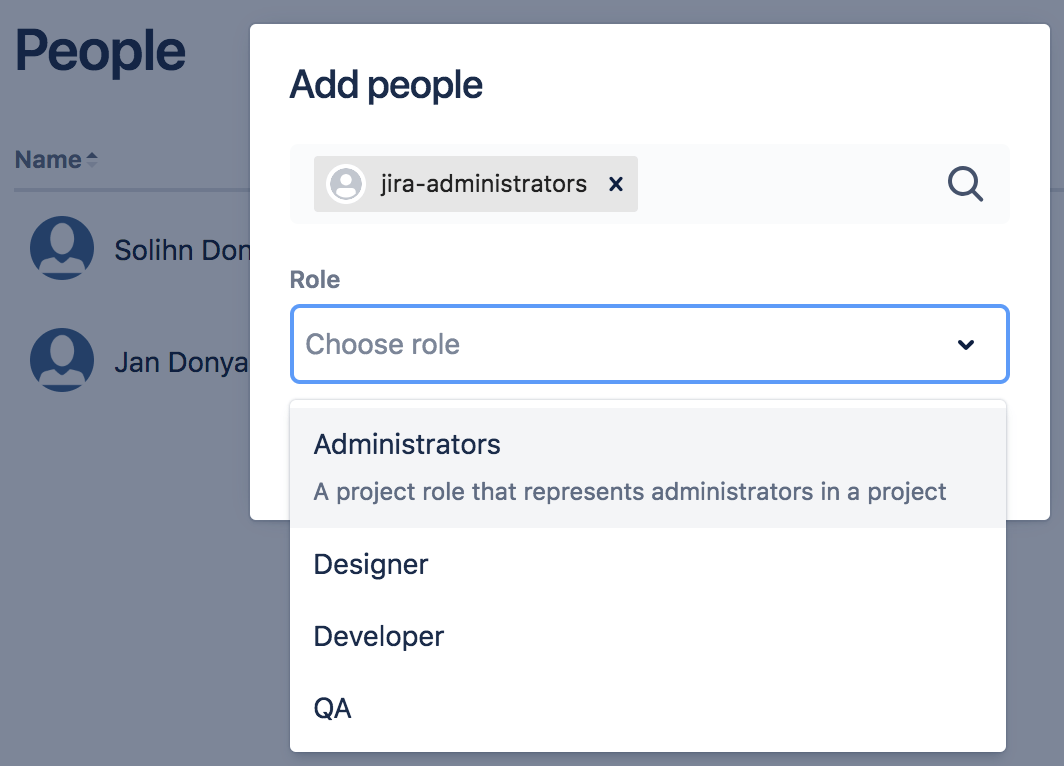 Choosing a project role for a the Jira Administrators group A 'group' contains multiple members. Groups are similar to project roles, but with 1 key difference: group membership is global whereas project role membership is project-specific. Also, group membership can only be altered by Jira administrators, whereas project role membership can be altered by project administrators.
Issue Security Schemes
Issue security schemes can be created and added to each project, allowing control over who can view and edit the issues of the project.
A scheme can have several security levels - and users or groups of users can be assigned to each security level. This ensures that only users who are assigned the appropriate security level may view the issue.
If your project has a defined issue security scheme, your linked Jira account must be a member of the appropriate security level in the security scheme. Typically, a security level's members may consist of:
- Individual members
- Groups
- Project Roles
- Issue roles such as 'Reporter', 'Project Lead', and 'Current Assignee'
- 'Anyone' (for example, to allow anonymous access)
In the example below, the issue security scheme has a defined security level which allows access to only certain users, groups, and project roles.
 Only user 'Jan Donyada', users in the 'Jira Administrators' group, and users with the 'QA' project role have access to the issues, as defined by the 'Top-secret' security level
Permission Schemes
Project permissions are created within Permissions schemes, which are then assigned to specific projects by your Jira Administrators.
Permissions can be granted for specific actions like creating issues, edit issues, assign issues, and so on. Permissions can be found by selecting Project Settings → Permissions.
Each permission can be granted across:
- Project roles
- Applications (JIRA, JIRA Service Desk, etc.)
- Groups
1. Project role
If a permission scheme associated with a project has defined role-specific permissions for specific actions, your linked Jira account must be assigned the same role to be authorized to use those actions in your Workato recipes.
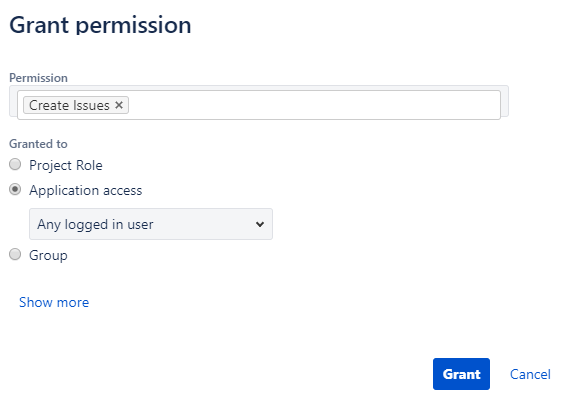
For example, in the project permission scheme below, only the 'QA' role has been permitted to perform the 'Close Issues' action. 
Hence, if the Workato recipe wants to perform any 'Close issue' actions, the linked Jira account must also be assigned the role 'QA' for the action to be authorized.
2. Application access
Application access settings let you control which person has access to which products. If your site only has one product (i.e. if you have a Confluence-only or Jira-only instance, for example) – users are automatically granted access to that product when they sign up.
If your Workato recipes only need to perform specific actions on your Jira Service Desk instance, then Jira Service Desk must be selected for those actions.
 Only users of Jira Service Desk are permitted to assign issues
Likewise, if your Workato recipes only need to perform specific actions on your Jira Software instance, then Jira Software must be selected for those actions.
If your Workato recipes performs specific actions on both Jira Service Desk & Jira Software, then Any logged in user must be selected for those actions.
 Any logged in user of either Jira Service Desk or Jira Software is permitted to assign issues
3. Groups
If a permission scheme associated with a project has defined group-specific permissions for specific actions, your linked Jira Service Desk account must be a member of that group to be authorized to use those actions in your Workato recipes.  The Jira Administrators group is permitted to manage sprints
Jira permissions helper
You can use the Jira permissions helper to find out why a user is unable to view/edit certain projects or fields.
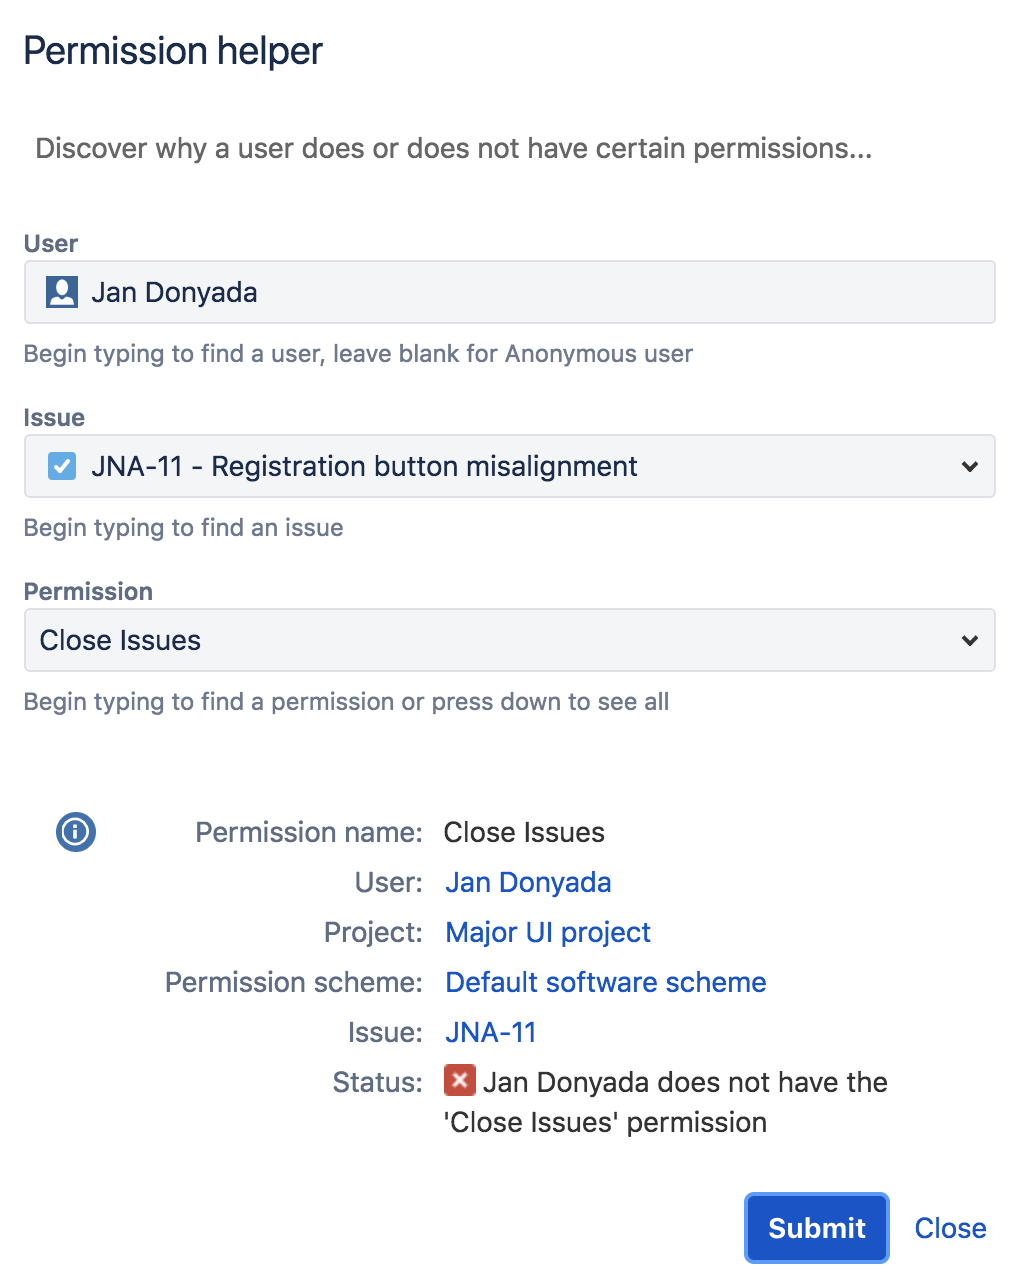
To utilize this, you'll need to have Jira Administrator access to your Jira Service Desk instance. Learn more by heading over to Jira's permissions helper guide.
Triggers and actions
You can browse the other chapters:
Jira Service Desk actions
Last updated: