Okta
Okta is a cloud service that organizes workforce and customer identities.
It provides cloud software that helps companies to manage secure user authentication for modern applications and helps developers to build identity controls into applications, web services, and devices.
API version
The Okta connector uses the Core Okta API v1.
Connection setup
Okta supports the following authentication types:
- Authorization code grant authentication (OAuth 2.0)
- Client credentials-based authentication (OAuth 2.0)
- API key-based authentication
Workato recommends using either authorization code grant authentication (OAuth 2.0) or client credentials-based authentication (OAuth 2.0) for improved security in your connection. These methods also let you define granular permissions that control which resources Workato can access in Okta.
VIRTUAL PRIVATE WORKATO (VPW) CUSTOMERS
This feature requires configuration steps that are specific to your Virtual Private Workato (VPW) instance. If you are a VPW customer, refer to your VPW private documentation for the configuration details for your instances.
Authorization code grant authentication
Authorization code grant authentication requires generating a client ID and secret in Okta.
Minimum and default scopes
OAuth 2.0 scopes define the level of access Workato has to your Okta instance. Review the following sections to determine which scopes to assign to your app integration for OAuth 2.0 authorization code grant authentication.
View minimum scopes
okta.logs.readokta.schemas.readoffline_accessopenid
View additional scopes
View default scopes
okta.logs.readokta.schemas.readoffline_accessopenidokta.eventHooks.manageokta.users.manageokta.groups.manageokta.apps.read
Create an app integration and secret for authorization code grant authentication
Complete the following steps to create an app integration and secret for authorization code grant authentication:
Sign in to your Okta organization as a user with administrator privileges.
Go to the Okta Admin Console and select Applications > Applications.
Click Create App Integration.
Find the Sign-in method section, and select OIDC - OpenID Connect.
Go to the Application type section and select Web Application.
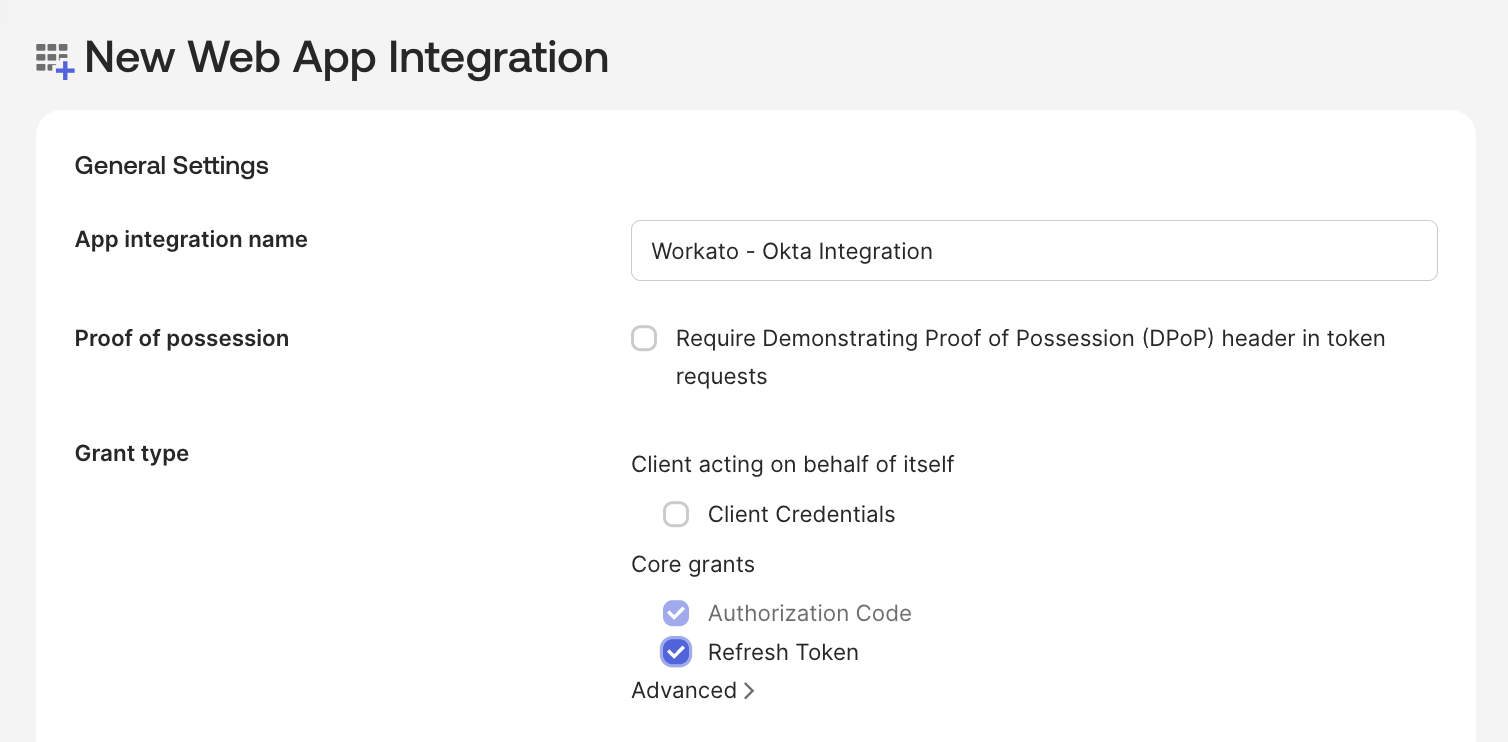
Enter a unique App integration name on the New Web App Integration page.
 Create a new app integration
Ensure the Require Demonstrating Proof of Possession (DPoP) header in token requests field is deselected.
Select the following checkboxes in the Client acting on behalf of a user field of the Grant type section:
- Authorization Code
- Refresh Token
Enter the following Workato callback URI in the Sign-in redirect URIs section: https://www.workato.com/oauth/callback
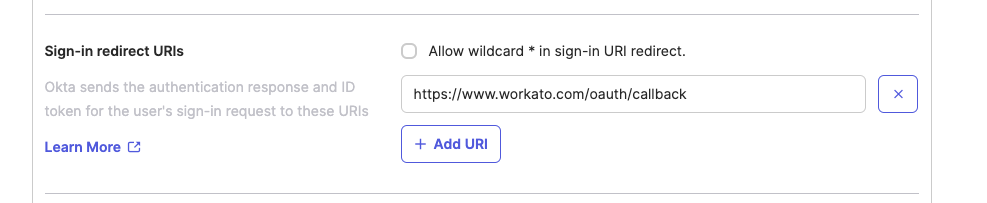 Sign-in redirect URIs
Select an Assignment option according to your preference and then select Save. Okta creates the app integration.
Go to the General tab and copy the Client ID and Client Secret so you can enter these credentials in Workato.
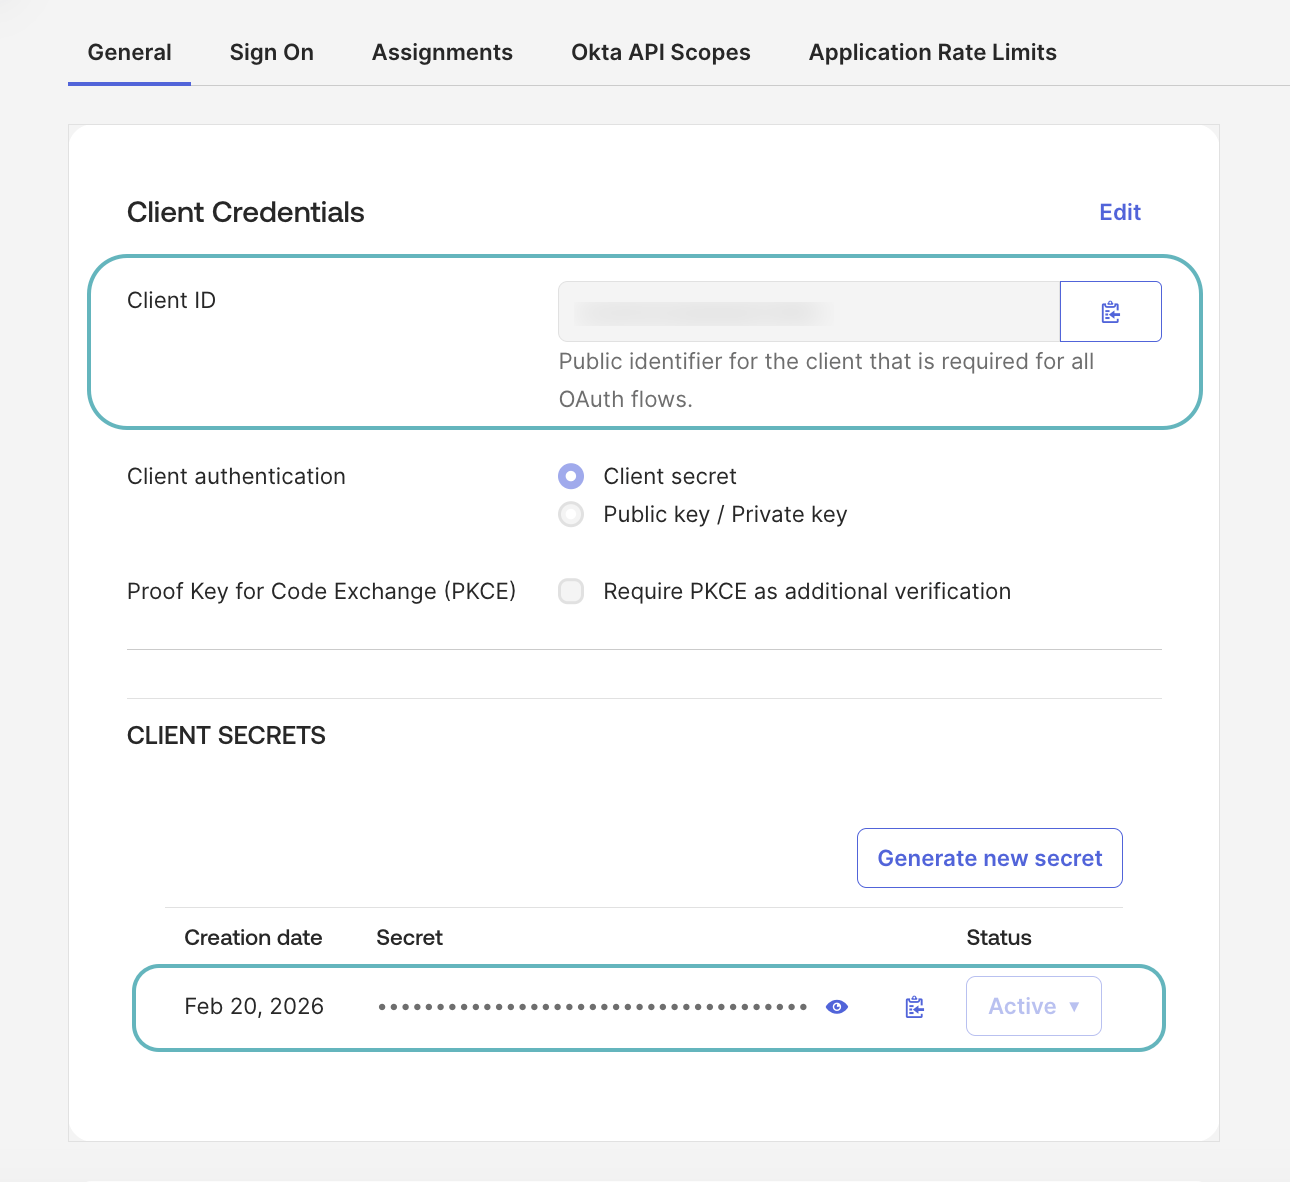 Copy the Client ID and Client Secret
Go to General Settings and ensure the Proof of possession field is deselected.
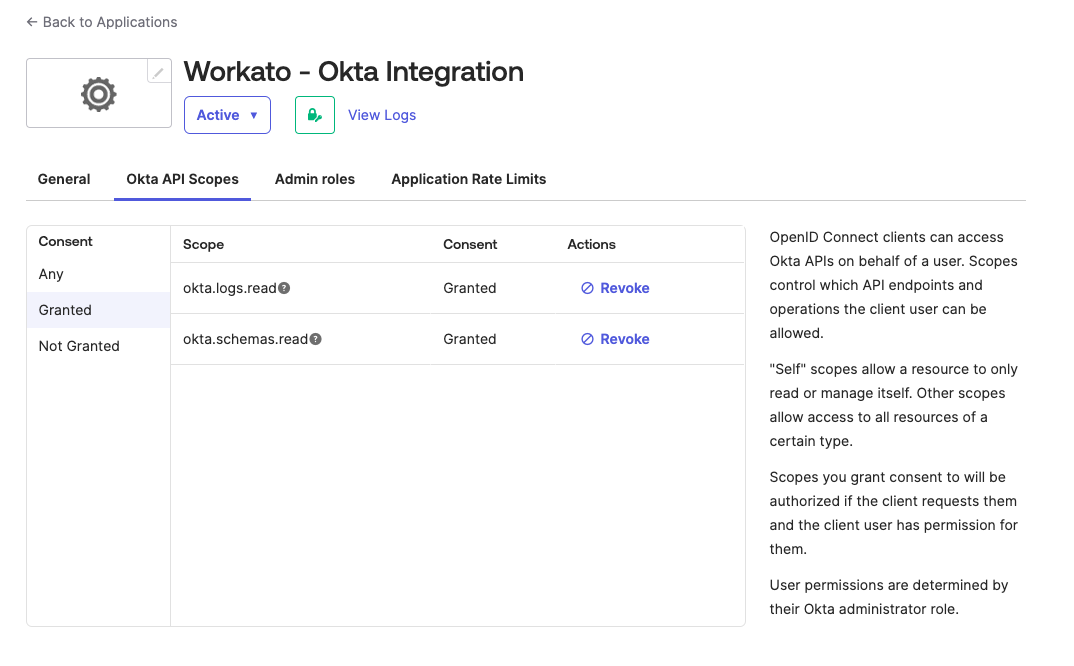
Go to the Okta API Scopes tab and assign the necessary scopes to the app integration. The connection requires the following scopes at a minimum:
okta.logs.readokta.schemas.read
offline_access and openid permissions are assigned automatically.
The connection requires the following additional scope if you are using a custom role:
okta.users.read
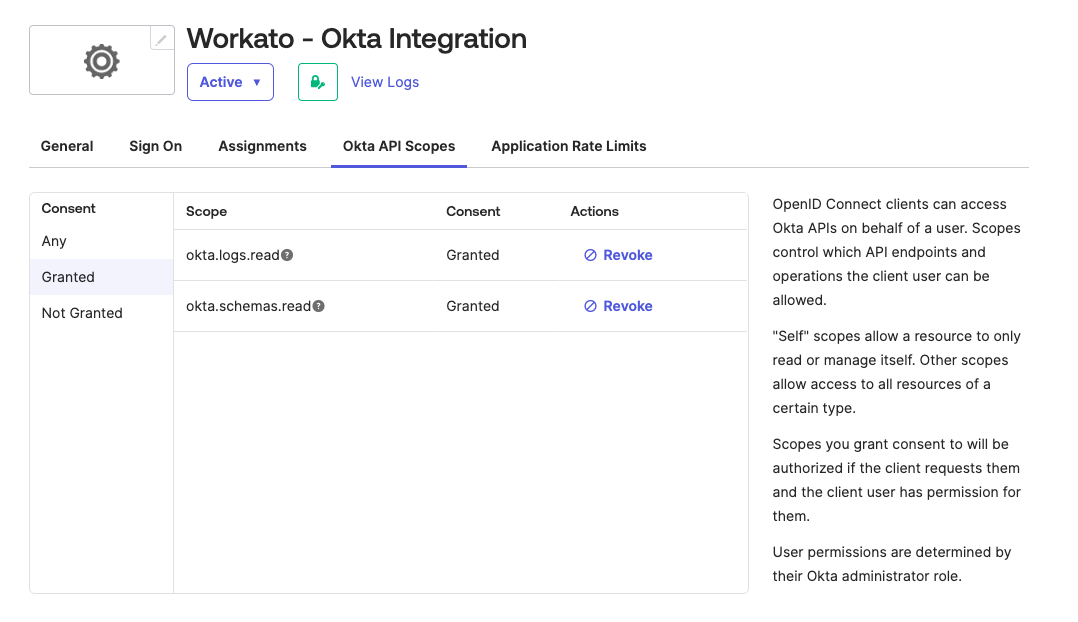 Assign Okta API scopes
Connect to Okta using authorization code grant authentication
Complete the following steps to create an authorization code grant connection to Okta in Workato:
Click Create > Connection or press C twice.
Search for and select Okta as your connection on the New connection page.
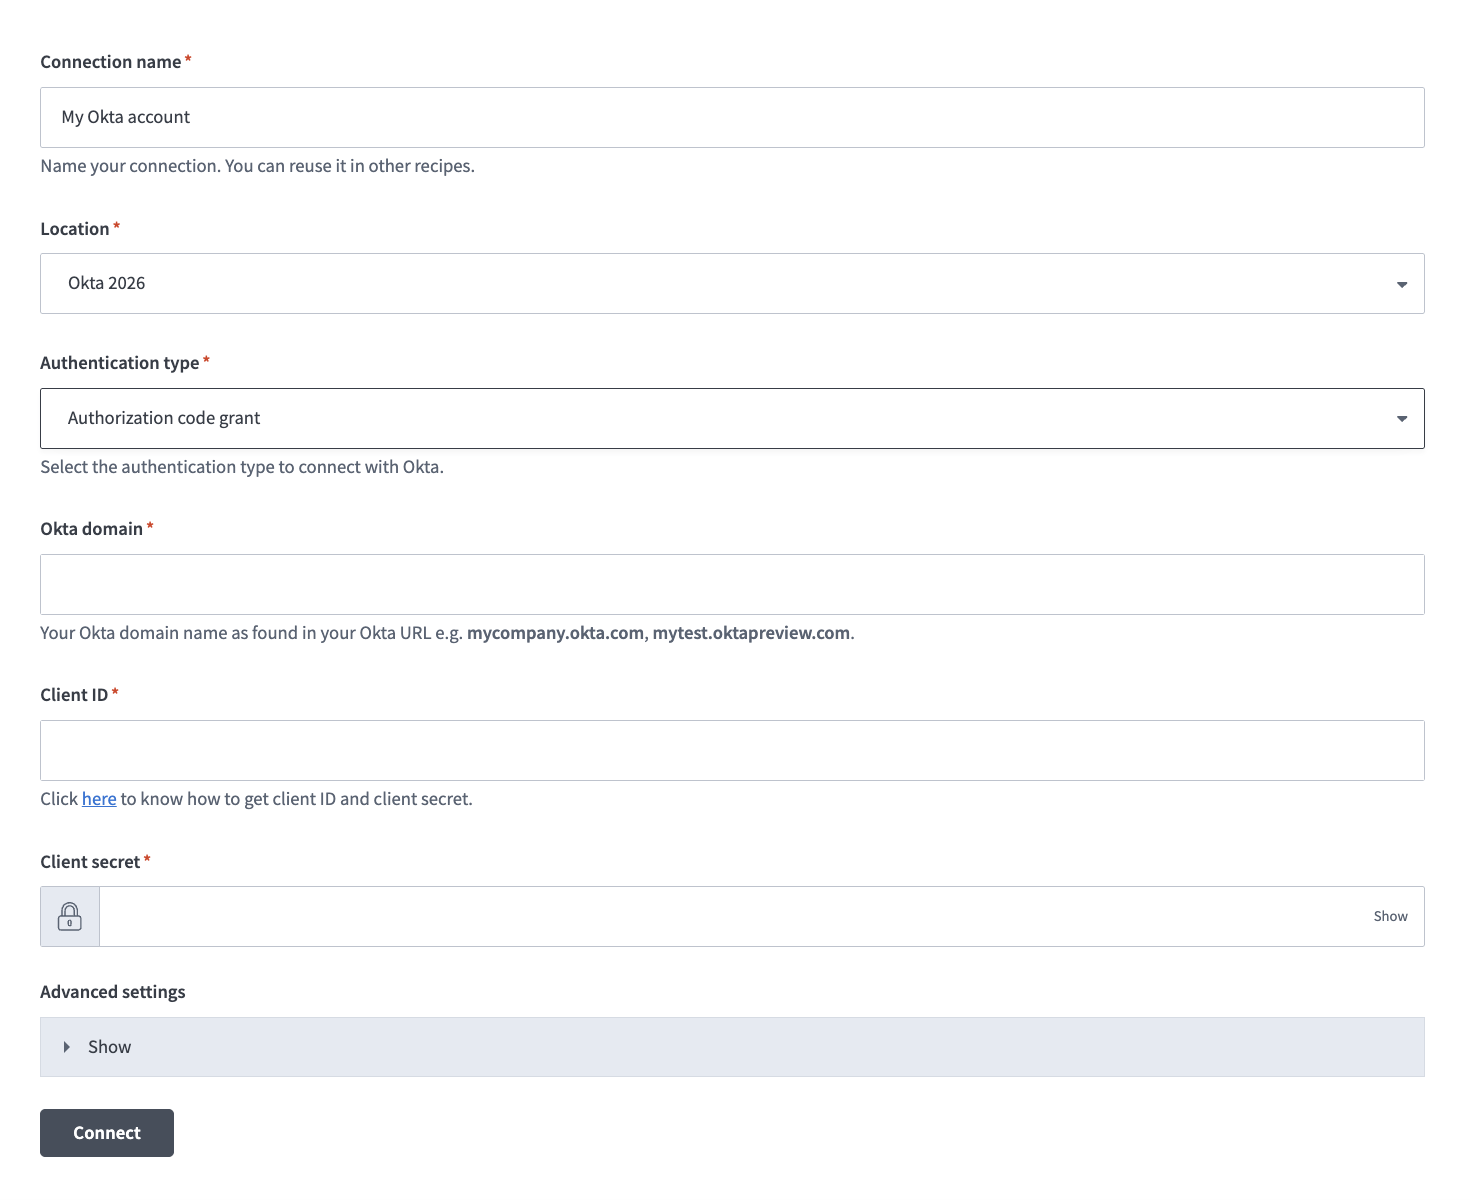
Provide a unique name for the connection in the Connection name field.
 Name your connection
Use the Location drop-down menu to select the project where you plan to store the connection.
Use the Authentication type drop-down menu to select Authorization code grant.
Enter your Okta domain name in the Okta domain field. For example, mycompany.okta.com or mytest.oktapreview.com. Ensure that the domain name you enter doesn't include -admin, such as mycompany-admin.okta.com, as this URL is used to access the Okta admin console from the UI and isn't an OAuth endpoint.
Enter your Client ID.
Provide your Client secret.
Expand the Advanced settings section and use the OAuth 2.0 scopes drop-down menu to select additional OAuth 2.0 scopes for this connection. The scopes must match the scopes defined in your Okta instance in Applications > Applications > Okta API Scopes.
Workato requests the scopes you specify in addition to the minimum required scopes. Workato requests the default scopes if you don't select specific scopes.
Click Connect.
Client credentials-based authentication
Client credentials authentication requires creating a client and private key in Okta.
Minimum and default scopes
OAuth 2.0 scopes define the level of access Workato has to your Okta instance. Review the following sections to determine which scopes to assign to your app integration for OAuth 2.0 client credentials authentication. Your app integration must be assigned the Read-only Administrator role in Okta if your connection uses more than the minimum required scopes. If your app integration uses a custom role, you can assign it an applicable custom role instead.
View minimum scopes
okta.logs.readokta.schemas.read
View additional scopes
View default scopes
okta.logs.readokta.schemas.readokta.eventHooks.manageokta.users.manageokta.groups.manageokta.apps.read
Create an app integration and private key for client credentials-based authentication
Complete the following steps to create an app integration and private key for client credentials-based authentication:
Sign in to your Okta organization as a user with administrator privileges.
Go to the Okta Admin Console and select Applications > Applications.
Click Create App Integration.
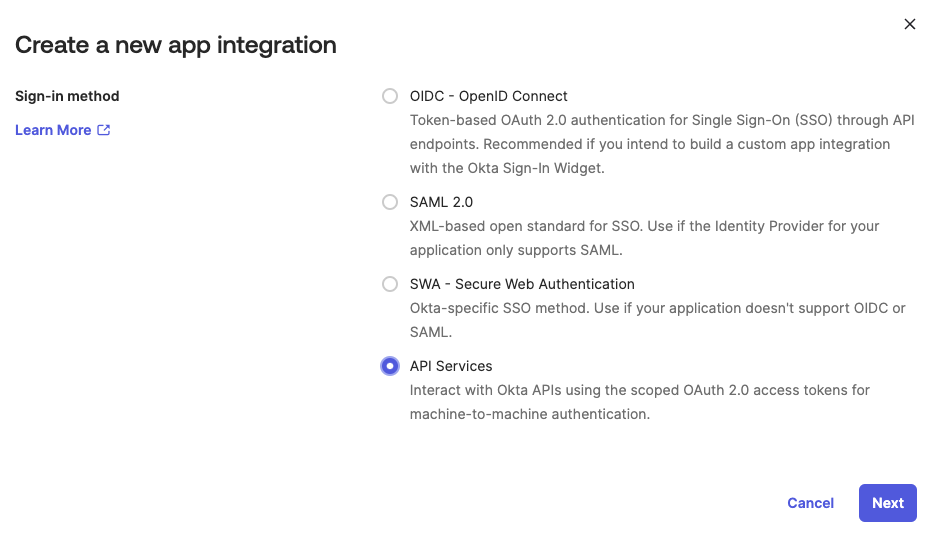
Select API Services in the Sign-in method section of the Create a new app integration page.
 Select API Services
Enter a unique App integration name and click Save on the New API Services App Integration page.
 Enter an App integration name
Click Edit and select Public key / Private key in the Client authentication section.
Go to the Public keys section and click Edit.
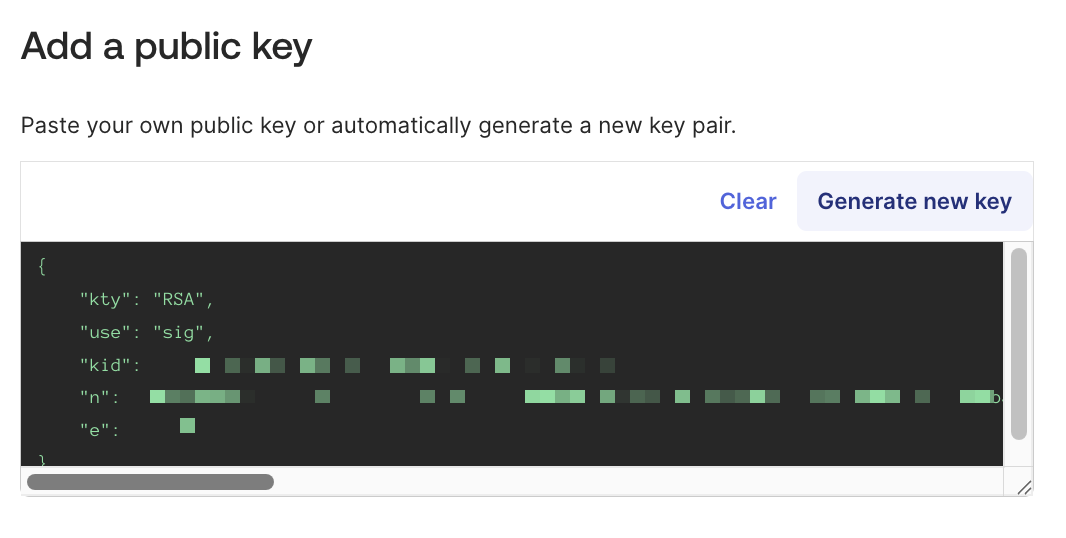
Click Add key.
Click Generate new key to generate a new key pair.
 Add a public key
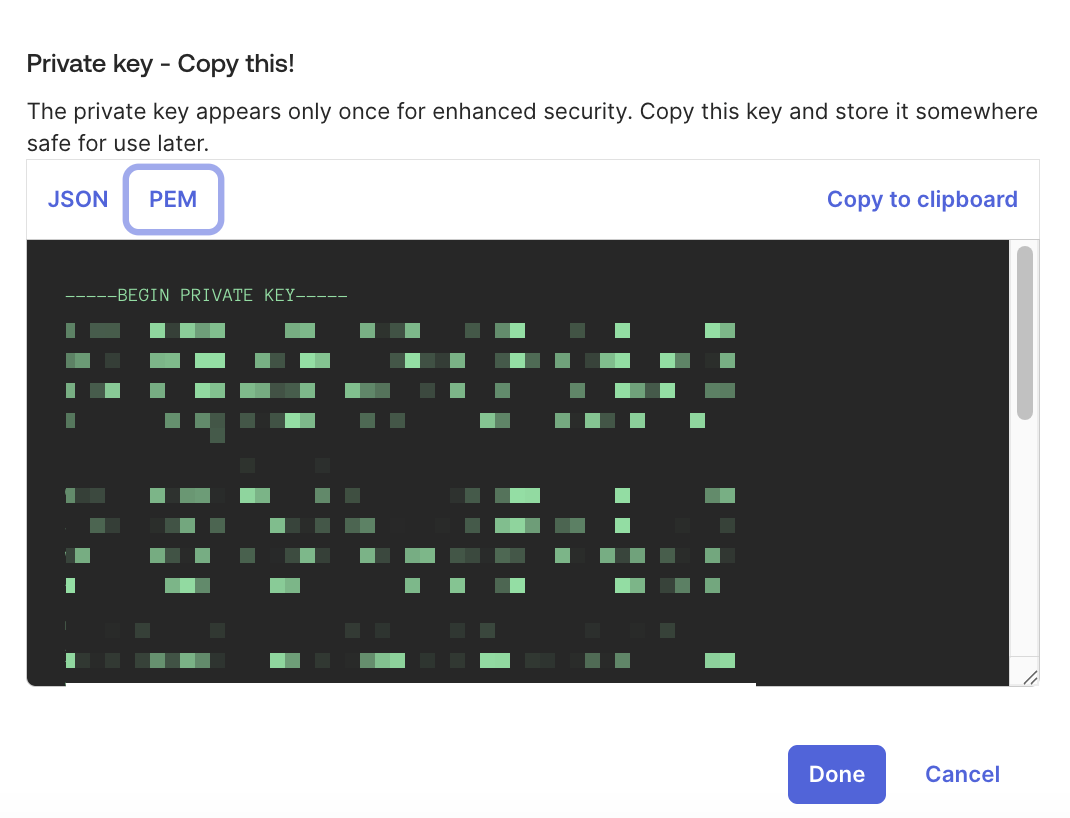
Go to the Private key section and select PEM.
Click Copy to clipboard to copy the private key. Enter this key in Workato's Okta connection settings. You can't retrieve the private key again after leaving the page.
 Click Copy to clipboard to copy the private key
Click Done.
Click Save in the new app integration's General tab to store and activate the key. You must save the key before you can use it to connect to Workato.
Click Save if you see the message Existing client secrets will no longer be used.
Verify that the key status changes to Active.
Go to General > General Settings and ensure the Proof of possession field is deselected.
Go to the Okta API Scopes tab and assign the necessary scopes to the app integration. The connection requires the following minimum scopes:
okta.logs.readokta.schemas.read
The connection requires the following additional scope if you are using a custom role:
okta.users.read
 Assign Okta API scopes
Go to the Admin roles tab and click Edit assignments.
Use the Roles drop-down menu to select Read-only Administrator or an applicable custom role.
Click Save changes.
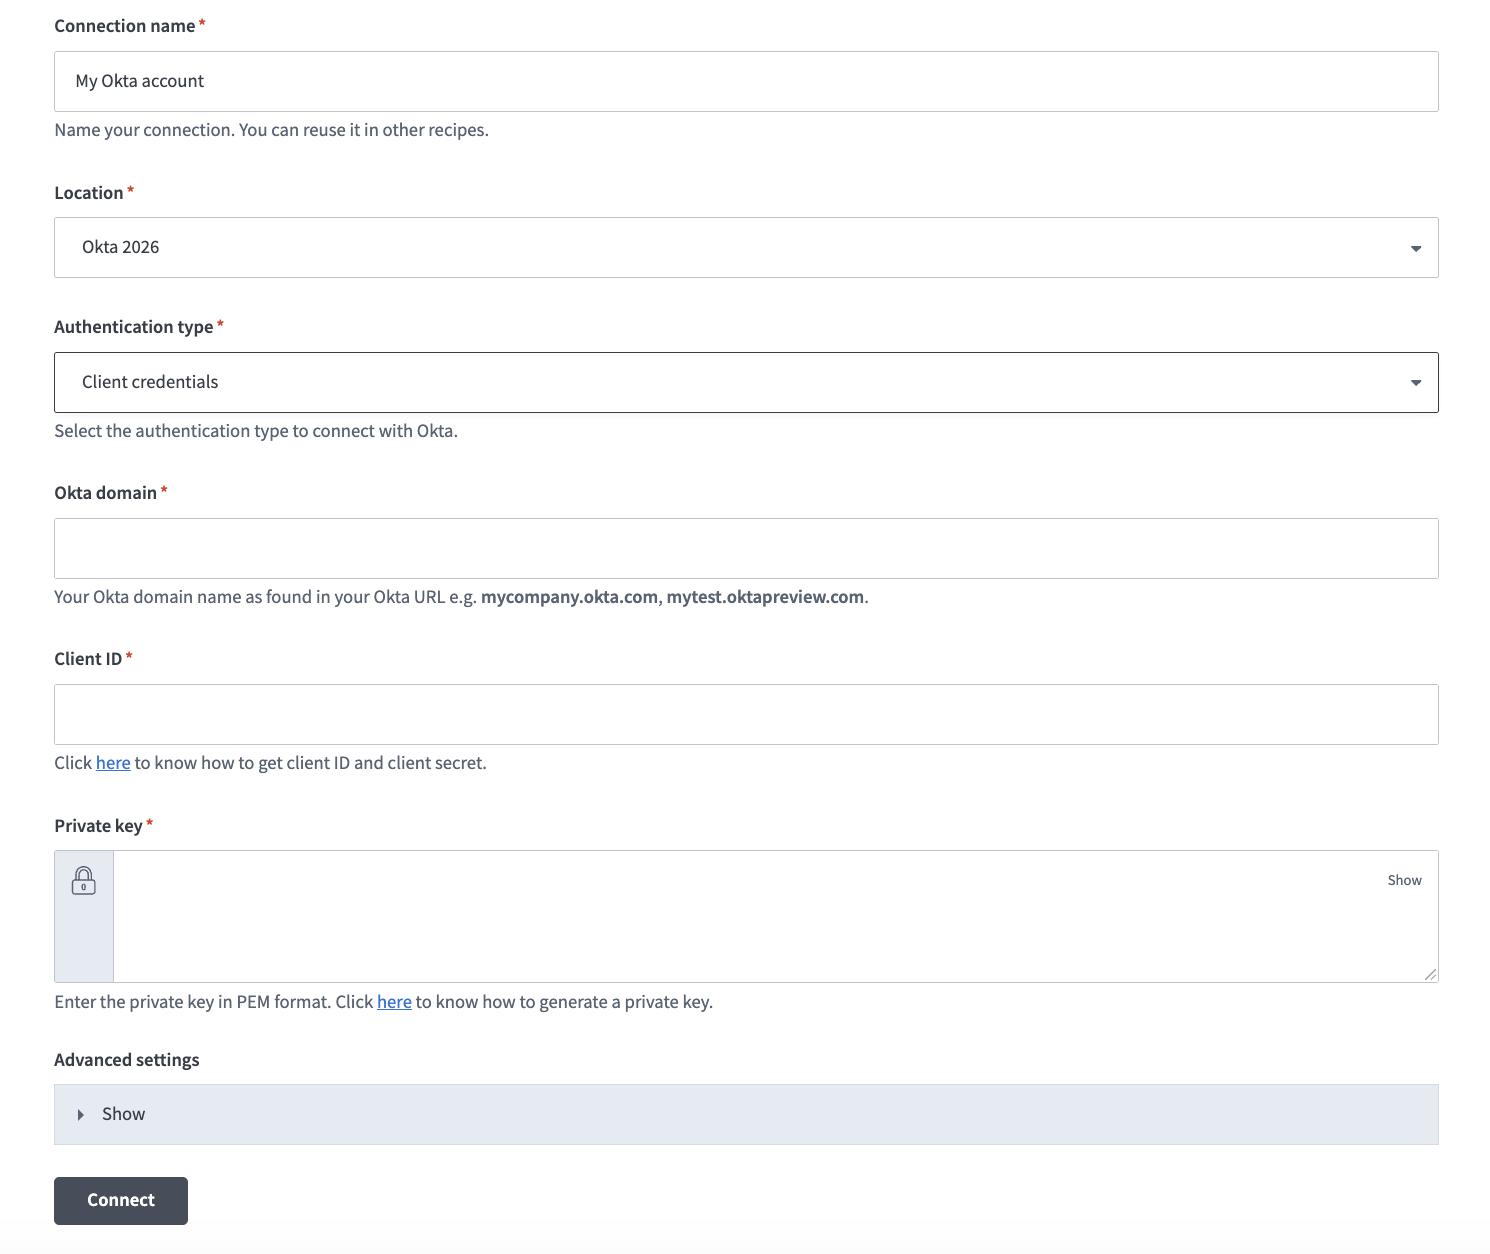
Connect to Okta using client credentials authentication
Complete the following steps to create a client credentials connection to Okta in Workato:
Click Create > Connection or press C twice.
Search for and select Okta as your connection on the New connection page.
Provide a unique name for the connection in the Connection name field.
 Name your connection
Use the Location drop-down menu to select the project where you plan to store the connection.
Use the Authentication type drop-down menu to select Client credentials.
Enter your Okta domain name in the Okta domain field. For example, mycompany.okta.com or mytest.oktapreview.com. Ensure that the domain name you enter doesn't include -admin, such as mycompany-admin.okta.com. This URL is used to access the Okta admin console from the UI and isn't an OAuth endpoint.
Enter your Client ID.
Provide the private key generated in Okta in PEM format in the Private key field. Ensure to include -----BEGIN PRIVATE KEY----- and -----END PRIVATE KEY-----.
Expand the Advanced settings section and use the OAuth 2.0 scopes drop-down menu to select additional OAuth 2.0 scopes for this connection. The scopes must match the scopes defined in your Okta instance in Applications > Applications > Okta API Scopes.
Workato requests the scopes you specify in addition to the minimum required scopes. Workato requests the default scopes if you don't select specific scopes.
Click Connect.
API key-based authentication
API key authentication requires generating an API key in Okta.
Generate an API key
API KEY PRIVILEGES AND LIMITATIONS
You must have administrator privileges in Okta to create an API key. Ensure that you're logged in as an administrator before you proceed.
Workato requires that the user and API key used in the connection have Organization Administrator or Super Administrator permissions. API keys inherit all permissions from the administrator who created them and can't be restricted to specific resources or operations. We recommend that you use a scoped OAuth 2.0 access token for improved security.
Refer to Create an API token for more information.
Complete the following steps to generate an API key in Okta:
Sign in to Okta.
Go to Security > API > Token.
Click Create token to generate an API key. The key inherits the permissions of the administrator who created it.
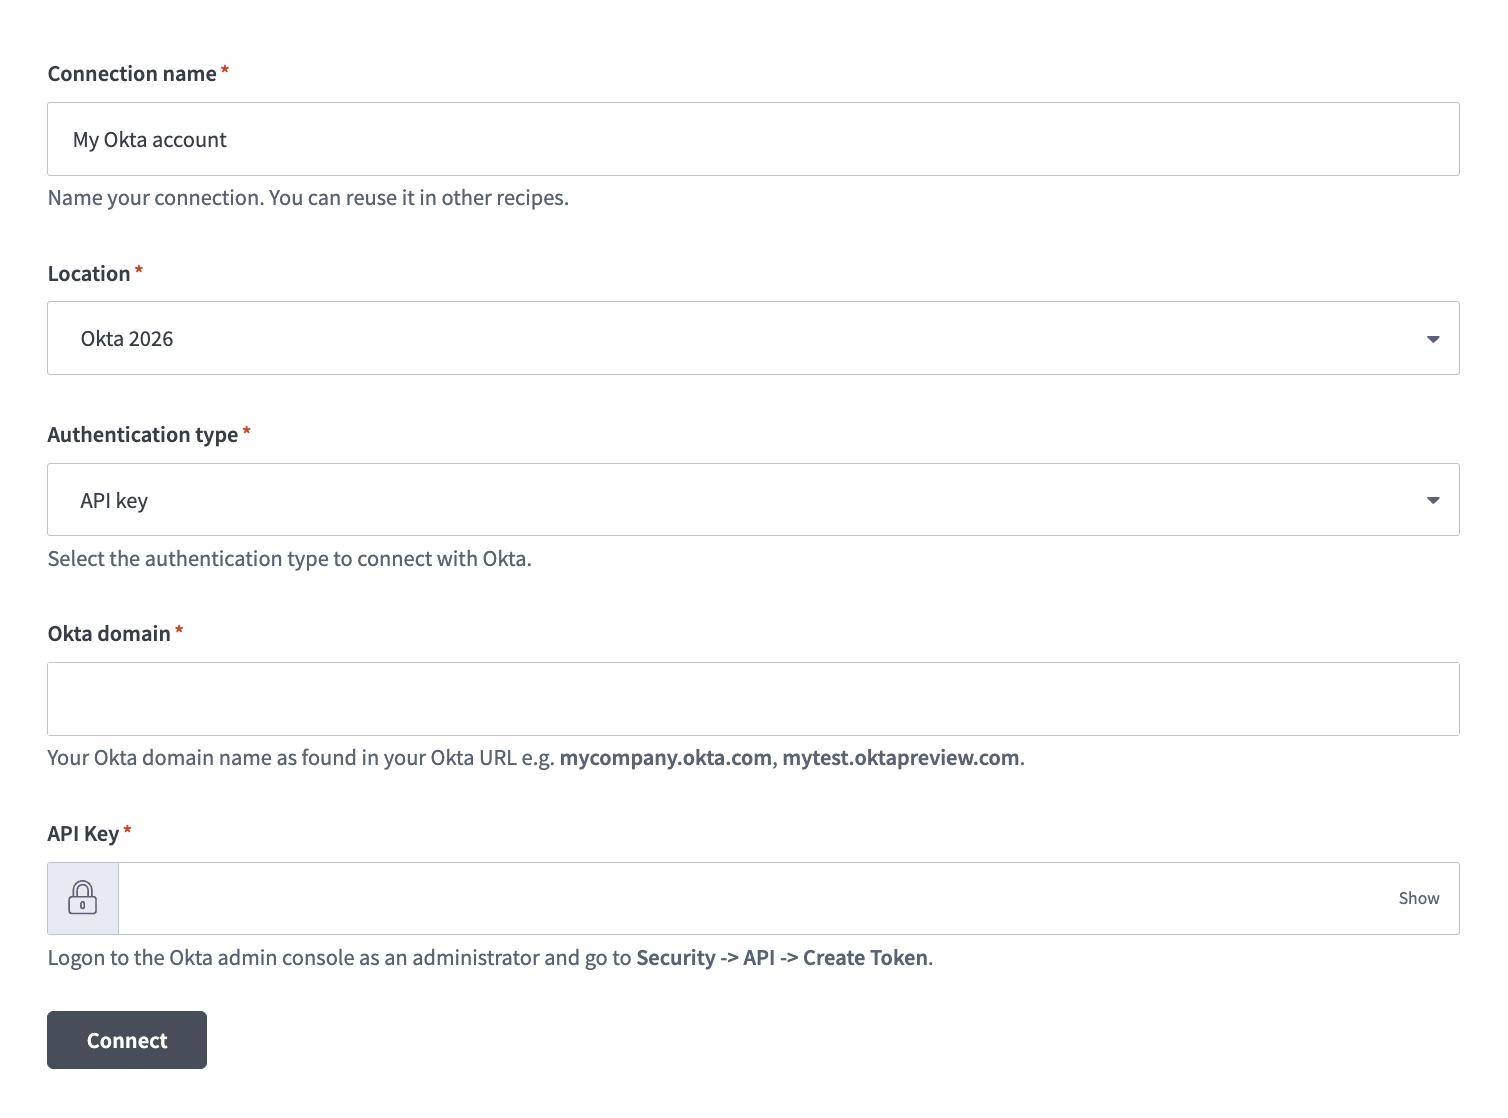
Connect to Okta using API key-based authentication
Complete the following steps to create an API key connection to Okta in Workato:
Click Create > Connection or press C twice.
Search for and select Okta as your connection on the New connection page.
Provide a unique name for the connection in the Connection name field.
 Okta API key connection setup
Use the Authentication type drop-down menu to select API key.
Enter your Okta domain name in the Okta domain field. For example, mycompany.okta.com or mytest.oktapreview.com. Ensure that the domain name you enter doesn't include -admin, such as mycompany-admin.okta.com, as this URL is used to access the Okta admin console from the UI and isn't an OAuth endpoint.
Enter the API key generated in your Okta instance.
Click Connect.
Last updated: