# Jira MCP server
The Jira MCP server enables LLMs to explore and manage Jira issues through natural conversation. It provides tools to search for issues, retrieve details, review comments and activity history, create new issues, update status, and modify issue fields without requiring direct interaction with the Jira interface.
The Jira MCP server lets your LLM synthesize information across multiple tickets to identify patterns, summarize comment threads, and highlight dependencies. Your LLM can aggregate customer tickets and surface critical issues for meeting preparation and compile your assignments and recent activity into coherent summaries for standup briefings.
# Uses
Use the Jira MCP server when you plan to perform the following actions:
- Check the status of a specific issue
- Create or update an issue
- Transition an issue to a new status
- Add a comment to an issue
- Get full context on an issue including comments and history
- Find issues by topic, assignee, status, or customer
- View issues assigned to you or a teammate
- Prepare for a customer call by reviewing their open issues
- Update priority status, reassign, or add labels to an issue
# Example prompts
What's the status of API-1234?Summarize the payment timeout bugWhat do I need to know about API-1234 before my meeting?Who's working on the login issue?Summarize API-456What's the history on API-789?What decisions were made on API-2323What issues does Acme Corp have?Summarize Acme's recent ticketsWhat's been escalated by Acme?Give me context before my call with Acme
# Jira MCP server tools
The Jira MCP server provides the following tools:
| Tool | Description |
|---|---|
| get_issue | Retrieves detailed information about a single Jira issue by its key or ID. |
| get_issue_changelog | Retrieves the change history for a specified issue, showing what fields changed, change date, who made the changes, and the old and new values. |
| get_issue_comments | Retrieves all comments for Jira issue by ID. |
| search_issues | Searches for Jira issues matching the criteria you specify. |
| create_issue | Creates a new Jira issue with the fields you specify. |
| get_account_id | Retrieves the account ID for the user you specify. |
| transition_issue | Transitions an issue to a new workflow status. |
| get_transition_id | Retrieves the transition ID for the issue you specify. |
| add_comment | Adds a comment to an existing Jira issue. |
| update_issue | Updates an existing Jira issue with the fields you specify. |
# Install the Jira MCP server
Complete the following steps to install a prebuilt MCP server to your project:
Sign in to your Workato account.
Go to AI Hub > MCP servers.
Click + Create MCP server.
Go to the Start with a template section and select the prebuilt MCP server you plan to use.
Click Use this template.
Provide a name for your MCP server in the MCP server name field.
Go to the Connections section and connect to your app account.
Select the connection type you plan to use for the MCP server template.
- User's connection: MCP server tools perform actions based on the identity and permissions of the user who connects to the application. Users authenticate with their own credentials to execute the skill.
- Your connection: This option uses the connection established by the recipe builder and follows the same principles as normal app connections.
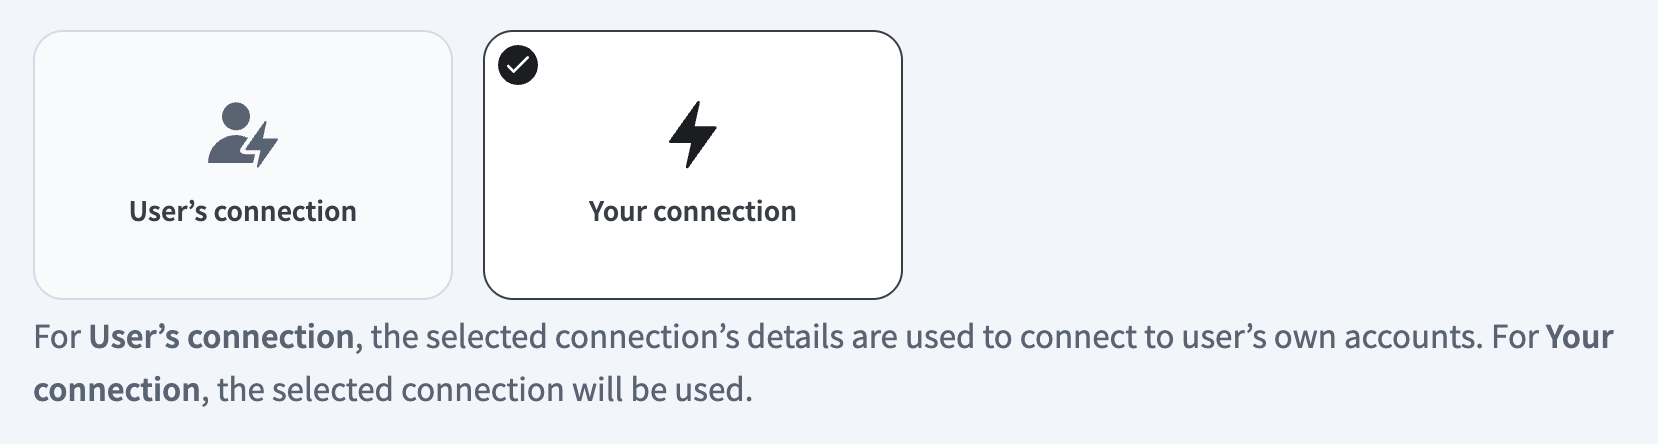 Select your connection type
VERIFIED USER ACCESS AUTHENTICATION REQUIREMENTS
Only app connections that use OAuth 2.0 authorization code grant are available for user's connection. Refer to Verified user access for more information.
Complete the app-specific connection setup steps in the following section.
# Jira connection setup
View Jira connection setup steps
There are four ways to connect to Jira:
We strongly recommend using API tokens, OAuth 2.0, or personal access tokens to connect to Workato instead of basic authentication with password.
LIMITATIONS
Authentication methods for the Jira connector have the following limitations:
- OAuth 2.0 doesn't support Jira Server, Jira Data Center, or real-time triggers.
- Basic authentication and personal access token authentication are the only supported authentication methods for on-prem Jira connections.
- Atlassian deprecated basic authentication for cloud connections in December 2018. On-premise Jira is not affected.
# API token
API tokens authenticate your Atlassian account without using a username and password. API token authentication doesn't support connections to on-premise Jira.
PREREQUISITES
You must generate an Atlassian API token for this authentication method. Refer to the Atlassian Manage API tokens (opens new window) guide for more information.
# Connect to Jira using an API token
Complete the following steps to connect to Jira in Workato using an API token:
Click Create > Connection.
Search for and select Jira as your connection on the New connection page.
Provide a name for your connection in the Connection name field.
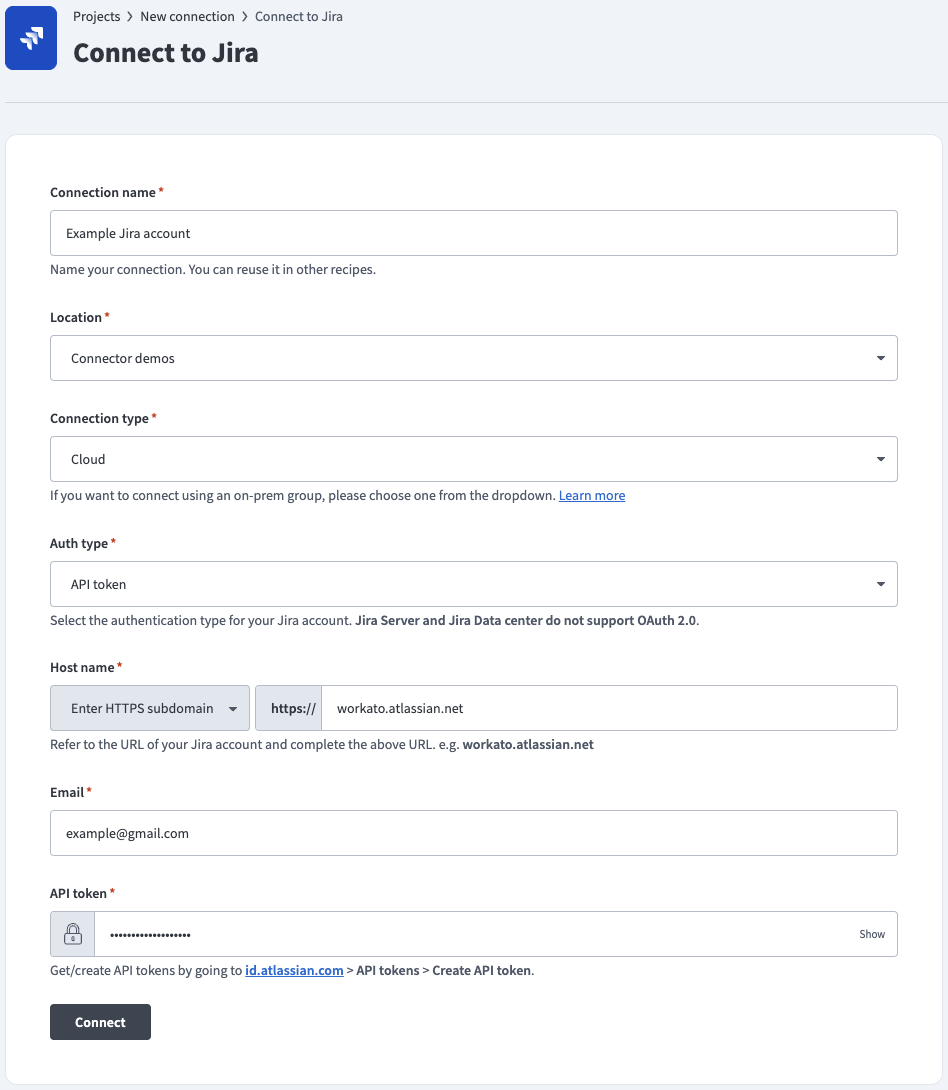 API token auth
Use the Location drop-down menu to select the project where you plan to store the connection.
Use the Connection type drop-down menu to select your connection type.
Use the Auth type drop-down menu to select API token or Service account (API token), depending on your account type.
Enter the URL subdomain for your Jira instance in the Host name field. For example: workato.atlassian.net
Enter the Email of the Jira account to link to Workato.
Enter the API token for your Atlassian account. Refer to the Atlassian Manage API tokens (opens new window) guide to generate this value.
Optional. Use the Custom OAuth profile drop-down menu to select a custom OAuth profile for your connection.
Click Connect.
# OAuth 2.0
OAuth 2.0 enables you to share specific data with an application while keeping your username, password, and other information private.
LIMITATIONS
OAuth 2.0 has the following limitations:
OAuth 2.0 doesn't support on-premise Jira connections.
OAuth 2.0 doesn't support real-time triggers because it is incompatible with webhooks. As an alternative, you can register the Webhooks connector in Jira to use Jira's static webhook functionality. Refer to the Atlassian Manage webhooks (opens new window) guide for registration steps.
# Connect to Jira using OAuth 2.0
Complete the following steps to connect to Jira in Workato using OAuth 2.0:
Click Create > Connection.
Search for and select Jira as your connection on the New connection page.
Provide a name for your connection in the Connection name field.
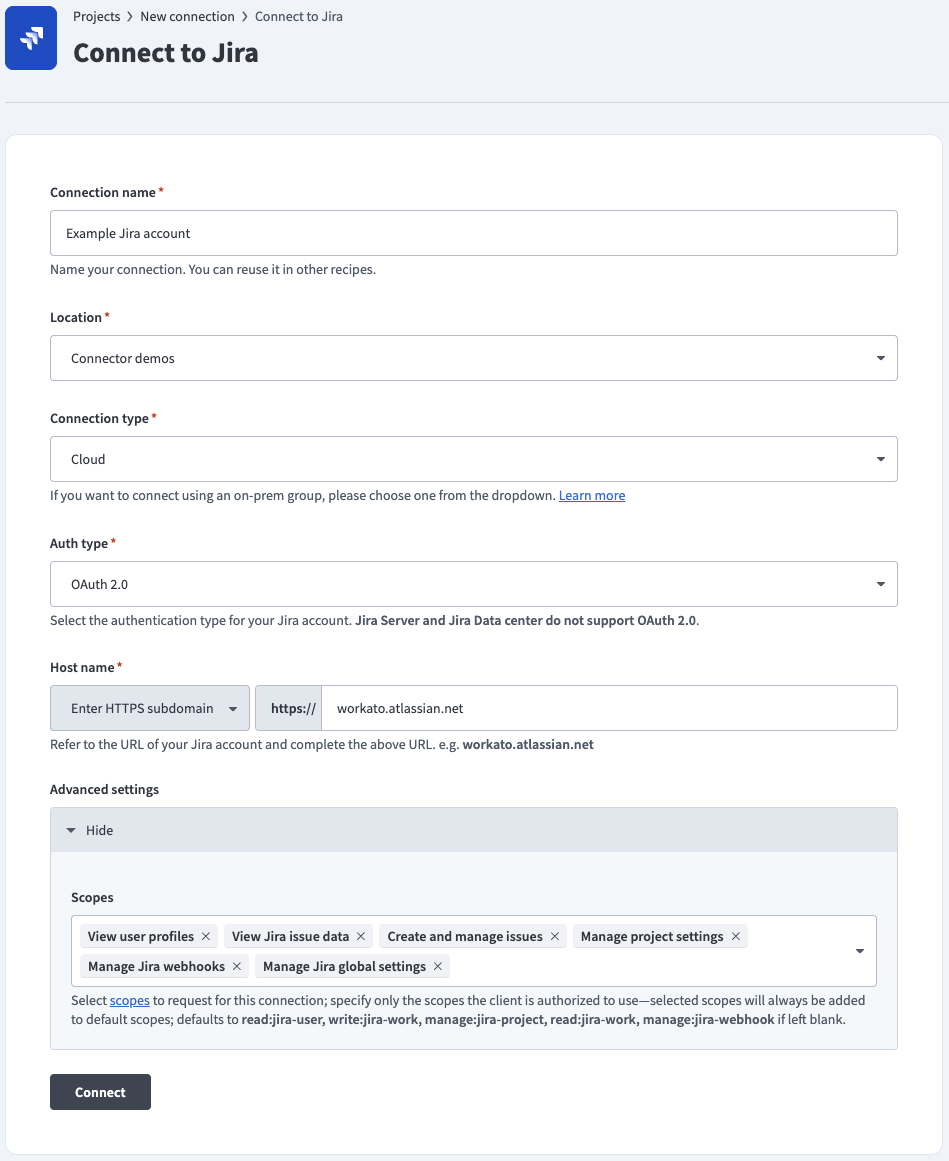 OAuth 2.0 auth
Use the Location drop-down menu to select the project where you plan to store the connection.
Use the Connection type drop-down menu to select your connection type.
Use the Auth type drop-down menu to select OAuth 2.0.
Enter the URL subdomain for your Jira instance in the Host name field. For example: workato.atlassian.net
Optional. Go to the Advanced settings section and select the authorization scopes to request. Workato requests the following scopes by default:
read:jira-userwrite:jira-workmanage:jira-projectread:jira-workmanage:jira-webhook
Optional. Use the Custom OAuth profile drop-down menu to select a custom OAuth profile for your connection.
Click Connect and sign in to your Jira instance.
Authorize Workato's request to access your Jira instance.
# Personal access tokens
Personal access tokens (PATs) authenticate your Atlassian account without using a username and password. PAT authentication supports on-premise Jira connections.
PREREQUISITES
You must generate an Atlassian personal access token for this authentication method. Refer to the Atlassian Using Personal Access Tokens (opens new window) guide for more information.
# Connect to Jira using a personal access token
Complete the following steps to connect to Jira in Workato using a personal access token:
Click Create > Connection.
Search for and select Jira as your connection on the New connection page.
Provide a name for your connection in the Connection name field.
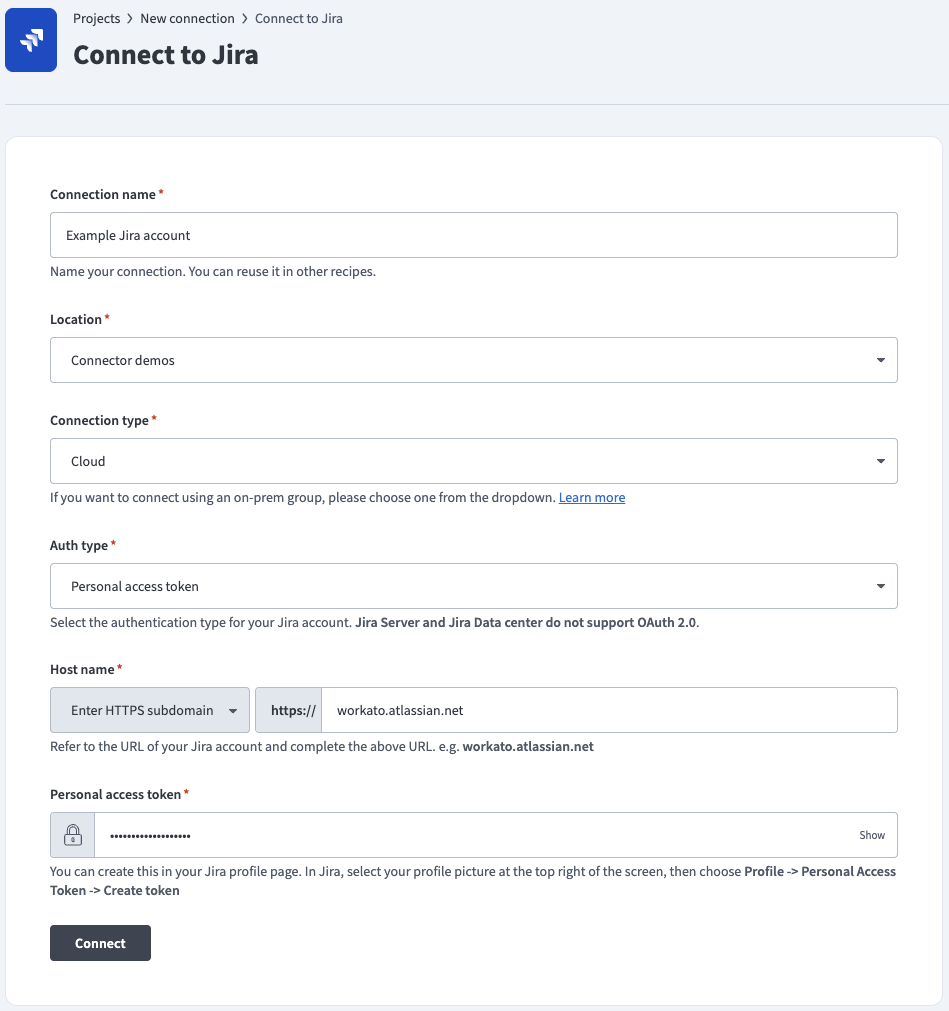 Personal access token auth
Use the Location drop-down menu to select the project where you plan to store the connection.
Use the Connection type drop-down menu to select your connection type.
Use the Auth type drop-down menu to select Personal access token.
Enter the URL subdomain for your Jira instance in the Host name field. For example: workato.atlassian.net
Enter the Personal access token of the Jira account to link to Workato. Refer to the Atlassian Using Personal Access Tokens (opens new window) guide to generate this value.
Optional. Use the Custom OAuth profile drop-down menu to select a custom OAuth profile for your connection.
Click Connect.
# Basic authentication with password
Basic authentication connects to your Atlassian account using a username and password. Basic authentication supports on-premise Jira connections.
DEPRECATED PASSWORD AUTHENTICATION
Atlassian deprecated basic authentication for cloud connections in December 2018. On-premise Jira is not affected.
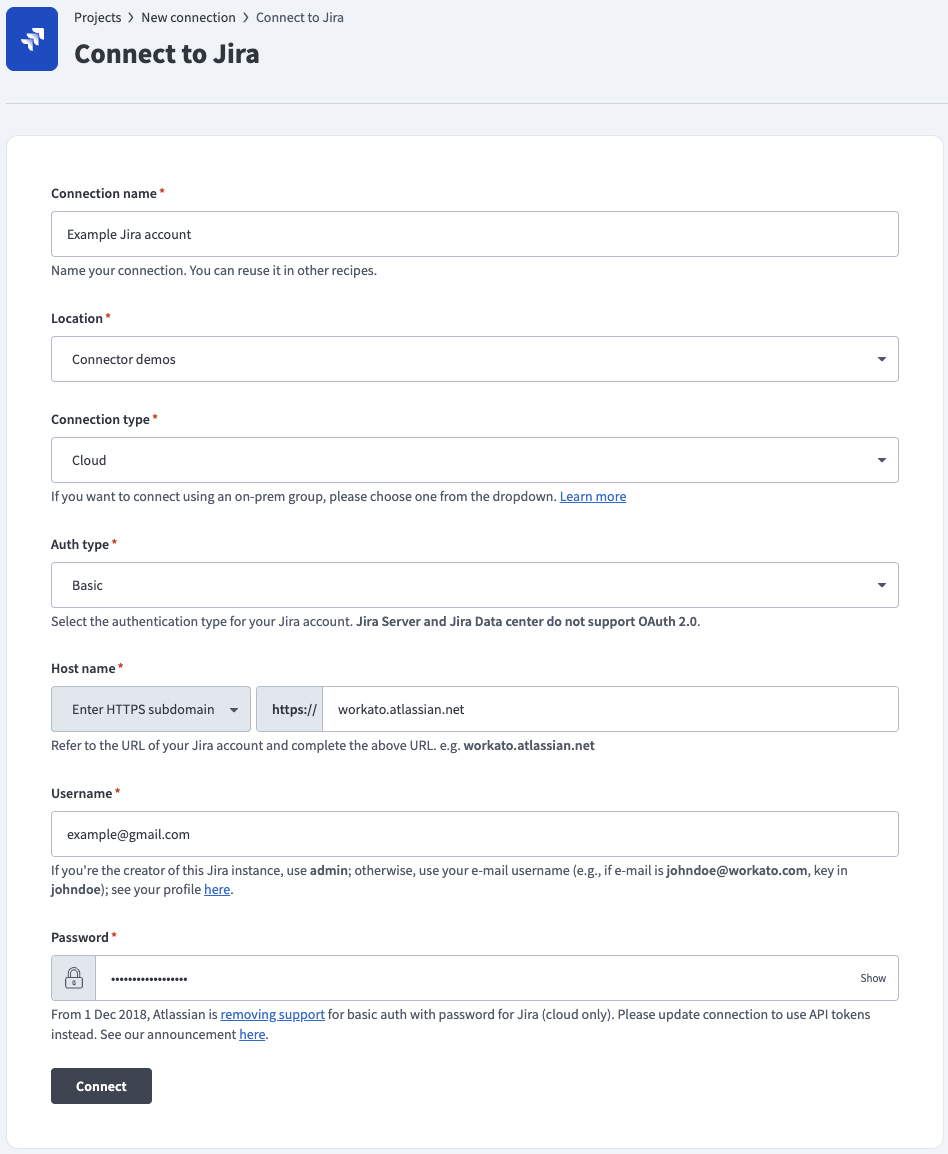
# Connect to Jira using basic authentication
Complete the following steps to connect to Jira in Workato using basic authentication:
Click Create > Connection.
Search for and select Jira as your connection on the New connection page.
Provide a name for your connection in the Connection name field.
 Basic password auth
Use the Location drop-down menu to select the project where you plan to store the connection.
Use the Connection type drop-down menu to select your connection type.
Use the Auth type drop-down menu to select Basic.
Enter the URL subdomain for your Jira instance in the Host name field. For example: workato.atlassian.net
Enter your Jira Username and Password.
Optional. Use the Custom OAuth profile drop-down menu to select a custom OAuth profile for your connection.
Click Connect.
# How to use Jira MCP server tools
Refer to the following sections for detailed information on available tools:
# get_issue tool
The get_issue tool retrieves the full details of a specific Jira ticket using its issue key, such as PROJ-123. Your LLM uses this tool to check the progress of a task, read the full requirements of a story, or see who is currently responsible for resolving a bug.
Try asking:
What is the current status of JIRA-101 and who is it assigned to?Show me the full description and priority for the 'login page' bug.Get the details for the task 'Update API documentation' and check for any linked issues.When was the ticket PROJ-45 created and are there any labels on it?
# get_issue_changelog tool
The get_issue_changelog tool retrieves the history of all changes made to a specific Jira ticket. Your LLM uses this tool to track how an issue has evolved, see when its status changed, or identify who modified specific fields like priority or assignee.
Try asking:
Show me the recent history of changes for PROJ-123.When was the status of JIRA-45 changed from 'In Progress' to 'Done'?Who changed the priority on the 'API integration' task?Get the changelog for the 'mobile-app' bug to see how many times it has been reassigned.
# get_issue_comments tool
The get_issue_comments tool retrieves the entire discussion history for a Jira ticket you specify. Your LLM uses this tool to catch up on team conversations, find specific decisions made regarding a task, or gather additional context that isn't in the main description.
Try asking:
Show me all the comments on JIRA-101.What have people been saying about the 'payment gateway' bug?Get the discussion history for PROJ-45 to see if there are any updates from the client.
# search_issues tool
The search_issues tool searches for Jira issues based on keywords, filters, or criteria you specify. Your LLM uses this tool to locate tickets within a project, find all tasks assigned to a specific person, or filter for bugs with a certain priority level.
Try asking:
Find all open bugs in the 'Mobile App' project.Search for issues containing the keyword 'authentication'.What tasks are currently assigned to @Sarah in the 'Marketing' project?Search for all high-priority tickets that haven't been updated in the last week.
# create_issue tool
The create_issue tool creates a new Jira issue with the fields you specify, including summary, description, issue type, priority, assignee, and labels. Your LLM uses this tool to capture bugs, feature requests, or tasks from your conversation and immediately create properly formatted, actionable issues without switching to the Jira interface.
Try asking:
Create a bug in PROJ for the timeout issue on the checkout page and assign it to Sarah.File a high-priority task about updating our SSL certificates.Create a story for the dark mode feature in the mobile app project.Open a new ticket for the API documentation update and label it 'documentation'.
# get_account_id tool
The get_account_id tool retrieves the Jira account ID for a user you specify. Your LLM uses this tool to find the correct account identifier before assigning issues, filtering by user, or performing other operations that require a specific account ID.
Try asking:
What's Josh's account ID in Jira?Get the account ID for jade.anderson@acme.com.Find the Jira account ID for the user 'Maria Rodriguez'.Look up the account identifier for our team lead before I assign them this bug.
# transition_issue tool
The transition_issue tool moves an issue to a new workflow status, such as from To Do to In Progress or from In Review to Done. Your LLM uses this tool to update issue status as work progresses, mark tasks complete, or move tickets through your team's workflow without manual clicks.
Try asking:
Move PROJ-123 to 'In Progress' status.Mark the authentication bug as 'Done'.Transition JIRA-456 to 'In Review' now that the code is ready.Change the status of the API task to 'Blocked'.
# get_transition_id tool
The get_transition_id tool retrieves the available workflow transition IDs for a specific issue. Your LLM uses this tool to identify which status changes are possible for a ticket based on your Jira workflow configuration before attempting to transition the issue.
Try asking:
What status transitions are available for PROJ-123?Show me the valid next steps for this ticket in the workflow.What are the transition options for the 'payment bug' issue?Check what statuses I can move JIRA-789 to from its current state.
# add_comment tool
The add_comment tool adds a comment to an existing Jira issue. Your LLM uses this tool to provide status updates, answer questions, share additional context, or document decisions directly in the ticket without leaving your conversation.
Try asking:
Add a comment to PROJ-123 saying we've completed the database migration.Comment on the login bug that we're investigating the root cause.Post an update to JIRA-456 with the latest test results.Add a note to the API task explaining the workaround we found.
# update_issue tool
The update_issue tool updates an existing Jira issue with the fields you specify, including summary, description, priority, assignee, labels, or any custom fields. Your LLM uses this tool to modify ticket details as requirements change, update priority levels, reassign work, or adjust issue fields based on your conversation.
Try asking:
Update PROJ-123 to high priority and assign it to Josh.Change the description of the checkout bug to include the new error details.Update JIRA-456 with the label 'needs-review' and increase its priority.Modify the API task summary to reflect that it now includes authentication updates.
# Getting started
View and manage your MCP server tools in the Overview page Tools section. Tool management provides the following capabilities:
TOOLS MUST BE STARTED
Your LLM can only access active tools in your MCP server connector.
Last updated: 3/20/2026, 3:48:26 PM